
Въведение
This manual provides essential information for the safe and efficient operation of your SCULPFUN S9 PRO 10W Laser Engraver. The S9 PRO features 10W laser beam shaping technology, offering a 0.06mm ultra-fine laser focus for strong cutting penetration and precision. It is capable of cutting materials such as 15mm thick wood and 10mm acrylic, and engraving ceramics and stainless steel. Please read this manual thoroughly before use to ensure proper setup, operation, and maintenance.

Информация за безопасност
Operating a laser engraver involves potential hazards. Adhere to all safety guidelines to prevent injury or damage.
- Защита на очите: Always wear appropriate laser safety glasses when operating the machine. The integrated laser filter on the S9 PRO blocks 98% of ultraviolet light, allowing observation without additional safety glasses for bystanders, but direct laser exposure should always be avoided.
- Превключвател на захранването: The machine is equipped with a secure power switch. Always turn off the machine when not in use or during maintenance.
- Сигурно разположение: Utilize the fastening holes on the four feet and frame structure to secure the machine and data cables, preventing accidental movement.
- Повърхностна защита: Use the provided A4-sized steel pad to protect your work surface from laser damage.
- Вентилация: Ensure adequate ventilation in your workspace to dissipate fumes produced during engraving and cutting.
- Запалими материали: Do not engrave or cut highly flammable materials without proper precautions.
- Деца и домашни любимци: Keep children and pets away from the operating area. The laser point can attract attention, but direct exposure is dangerous.

Съдържание на пакета
При разопаковане проверете дали всички компоненти са налични:
- 1 x SCULPFUN S9 Pro 10 W Laser Engraver
- A4-sized steel pad
- Захранващ адаптер
- USB кабел
- Инструменти за сглобяване
- Ръководство на потребителя (този документ)
Ръководство за настройка
1. Сглобяване
The SCULPFUN S9 PRO features a fast assembly design, allowing for installation typically within 10 to 20 minutes. Follow the steps below:
- Стъпка 1: Assemble the main frame components.
- Стъпка 2: Attach the X-axis and laser module to the frame.
- Стъпка 3: Свържете всички необходими кабели.
- Завършете: Уверете се, че всички връзки са сигурни и рамката е стабилна.
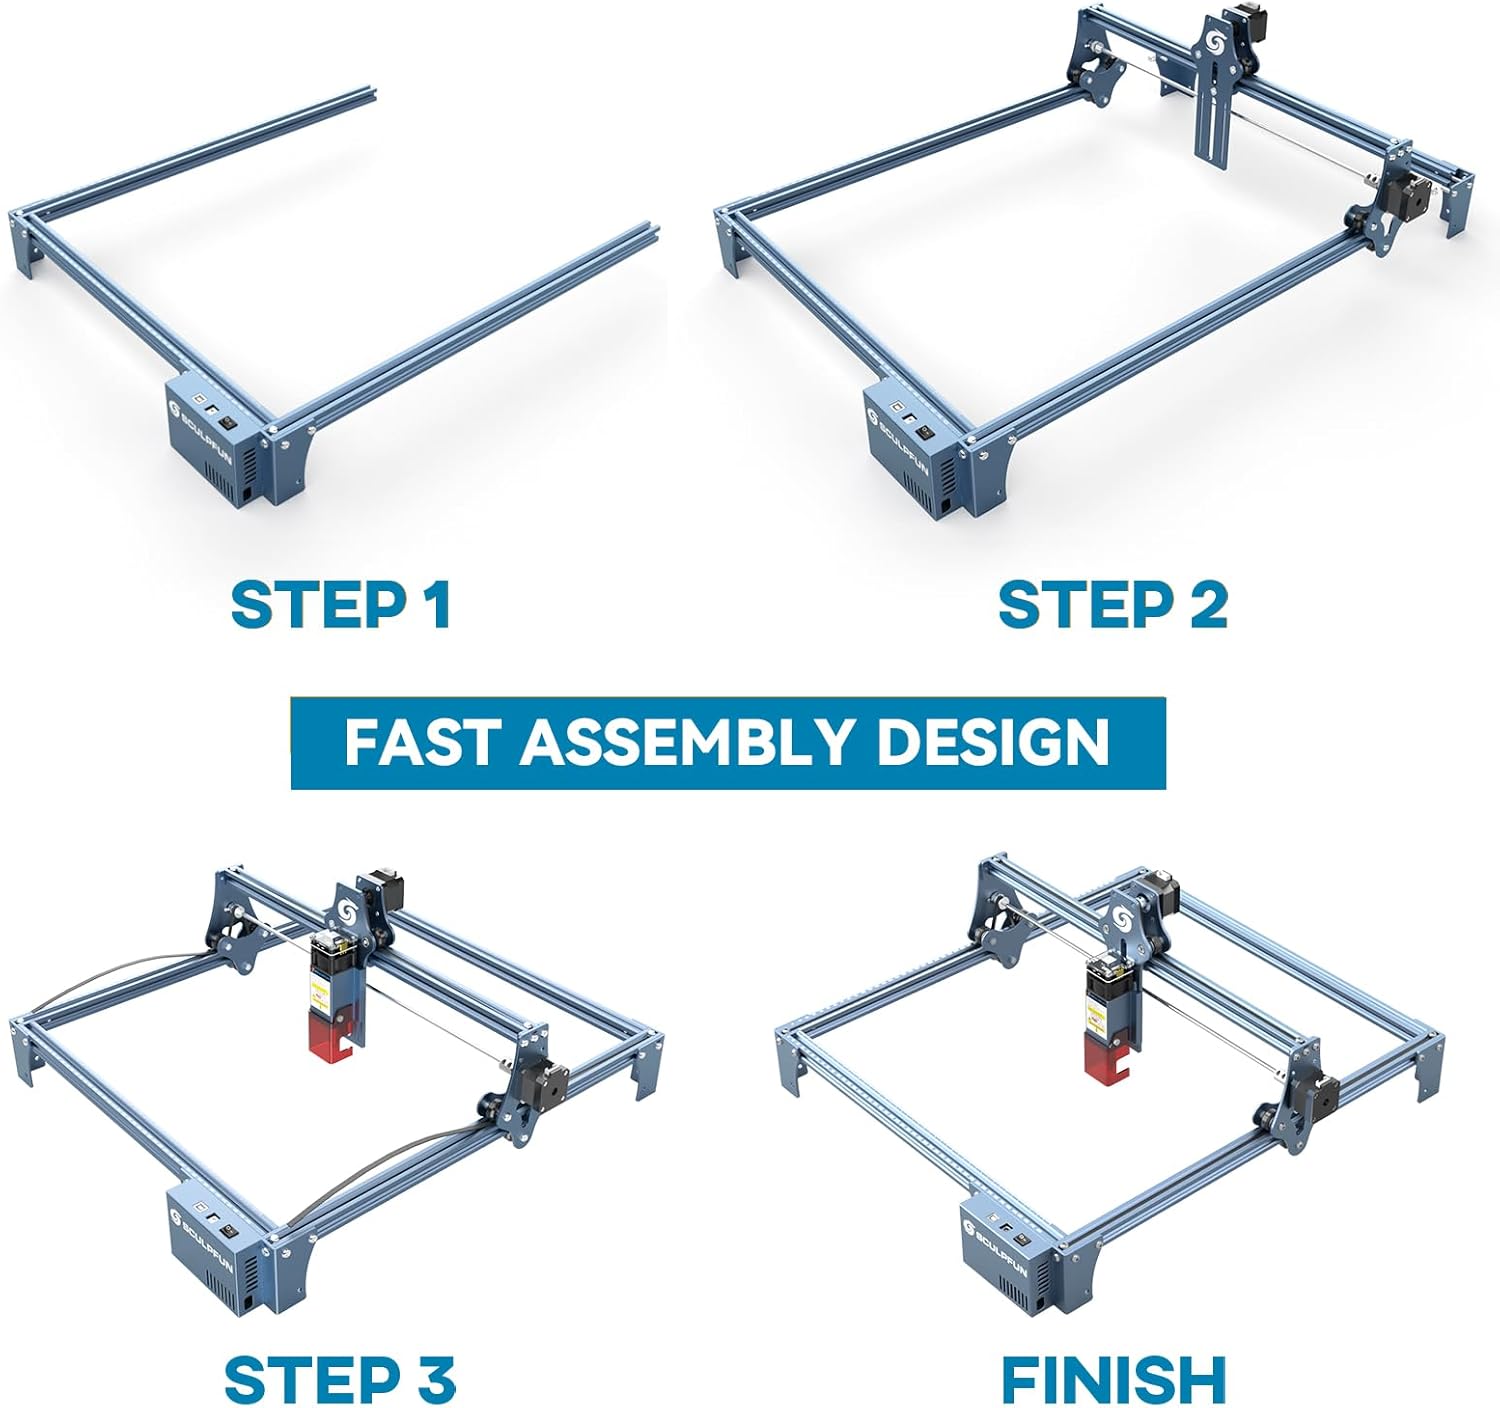
The full-metal structure enhances robustness and engraving accuracy. The X and Y axes include precise scale lines, forming a rectangular measuring ruler for quick object sizing.


2. Регулиране на фокуса
The S9 PRO features a quick fixed-focus design. The laser combines a fixed-focus lens with a sliding design for easy adjustment.
- Place the laser module over your material.
- Move the laser module up or down until the focus is achieved.
- Затегнете винтовете, за да закрепите лазерния модул на място.

Инструкция за работа
1. Съвместимост на софтуера
The SCULPFUN S9 PRO is compatible with various advanced engraving software:
- LaserGRBL (Windows)
- LightBurn (Windows, macOS, Linux)
- Бенбокс
- GrblController
- LiteFire
It supports engraving in PWM mode and various file formats including JPG, PNG, DXF, SVG, AI, G-code, NC, and BMP.

2. Material Capabilities
The 10W laser module provides strong cutting and engraving capabilities across a wide range of materials:
- Рязане: Up to 15mm thick wood, 10mm black acrylic.
- Гравиране: Wood, leather, ceramics, stainless steel, aluminum oxide, PCB board, paper, cardboard, dark stone, and more.


3. General Operation Workflow
- Дизайн: Create or import your design using compatible software (e.g., LightBurn, LaserGRBL).
- Разположение на материала: Place your material on the work surface, ensuring it is flat and secure. Use the integrated rulers for precise positioning.
- Регулиране на фокуса: Adjust the laser focus as described in the Setup section.
- Софтуерни настройки: Configure laser power, speed, and passes in your chosen software according to the material and desired effect. Refer to software documentation for detailed settings.
- Начало на операцията: Initiate the engraving or cutting process from the software. Monitor the machine during operation.
- Завършване: Once the process is complete, turn off the machine and carefully remove your finished piece.
Поддръжка
Regular maintenance ensures optimal performance and extends the lifespan of your SCULPFUN S9 PRO.
- Почистване на лазерната леща: Периодично почиствайте лазерната леща с мека кърпа без власинки и разтвор за почистване на лещи, за да поддържате прецизността на лазера.
- Почистете работната зона: Remove debris and dust from the engraving area after each use to prevent interference with machine movement.
- Inspect Belts and Rails: Check the drive belts for tension and wear. Keep the guide rails clean and lubricated if necessary to ensure smooth movement of the laser module.
- Актуализации на фърмуера: Check the official SCULPFUN website for any available firmware updates to ensure your machine has the latest features and improvements.
Отстраняване на неизправности
Този раздел разглежда често срещани проблеми, с които може да се сблъскате.
- Лазерът не свети:
- Check if the power cable is securely connected and the power switch is on.
- Verify that the USB cable is connected to your computer and the machine.
- Ensure the software is correctly configured and sending commands.
- Check the laser module connection.
- Лошо качество на гравиране/рязане:
- Re-check the laser focus. An incorrect focus is a common cause of poor quality.
- Adjust laser power and speed settings in your software. Different materials require different settings.
- Уверете се, че материалът е плосък и здраво поставен.
- Почистете лазерната леща, ако изглежда замърсена.
- Machine Not Moving Correctly:
- Check for any obstructions on the rails or belts.
- Ensure belts are properly tensioned and not slipping.
- Verify that all cables are securely connected.
- Рестартирайте софтуера и машината.
- Проблеми със софтуерната връзка:
- Ensure the correct COM port is selected in your software.
- Try restarting your computer and the engraver.
- Reinstall the software or drivers if necessary.
For persistent issues, refer to the SCULPFUN support webсайт или се свържете с отдела за обслужване на клиенти.
Спецификации
| Марка | SCULPFUN |
| Номер на модела | S9PRO10W-ELE |
| Лазерна мощност | 10W (Diode Laser) |
| Лазерен фокус | 0.06mm (Ultrafine) |
| Точност на гравиране | 0.01 мм |
| Зона за гравиране | 400 х 410 мм |
| Източник на захранване | AC |
| Размери на опаковката | 61.79 х 38.4 х 13.4 см |
| Тегло на опаковката | 4.95 кг |
| Включени компоненти | 1 x SCULPFUN S9 Pro 10 W laser engraver |
| Софтуерна съвместимост | LaserGRBL, LightBurn, Benbox, GrblController, LiteFire |
| Поддържана ОС | Windows, macOS, Linux |
| Поддържа се File Формати | JPG, PNG, DXF, SVG, AI, G-code, NC, BMP |
Гаранция и поддръжка
For warranty information, technical support, or service inquiries, please contact SCULPFUN customer support through their official webсайта или търговеца на дребно, от който е закупен продуктът. Запазете касовата си бележка като доказателство за покупка.
производител: SCULPFUN
Първа налична дата: 29 ноември 2024 г