Въведение
This manual provides detailed instructions for the Saitake Wireless Arcade Fight Stick Joystick. It covers product features, setup, operation, connection methods, and troubleshooting to ensure optimal performance across various platforms including PC, Android, iOS, Nintendo Switch, PS3, and PS4.
Продуктът е свършилview
Видео: Овърview of the Saitake Arcade Fight Stick, showcasing its design, joystick, buttons, and key features.
Ключови характеристики
- Мултиплатформена съвместимост: Compatible with Windows PC, Android, iOS, Nintendo Switch 1/2, PS3, and PS4.
- Три метода на свързване: Supports Bluetooth, 2.4GHz wireless (with included receiver), and wired (Type-C) connections.
- Вграден дисплей: A 1.9-inch functional display screen shows function options, volume, lighting effects, brightness, and language settings.
- 3.5 мм жак за слушалки: For audio output and communication.
- TURBO функция: Equipped with standard turbo and upgraded auto turbo modes for rapid input execution.
- макро функция: Customize button mappings and create macro commands with up to 18 keystrokes, including trigger timestamps.
- Джойстик с висока прецизност: Features an adjustable RGB light ring with 4 modes and 7 colors.
- Нископрофесионаленfile Червени превключватели: Buttons utilize low-profile red switches for light pressure and quick response.
- Ергономичен дизайн: Designed for comfortable and extended gaming sessions.
Product Layout and Button Functions
Familiarize yourself with the layout and functions of the arcade fight stick's buttons and controls.

Image: Detailed diagram of the Saitake Arcade Fight Stick showing the location and labels of all buttons and features.
- A: Опция от менюто
- B: Joystick Function Option
- C: Джойстик
- D: Дисплей на екрана
- E: Турбо бутон
- F: Бутон ИЗБОР
- G: Бутон СТАРТ
- H: Бутон НАЧАЛО
- I: Опция за свързване
- J: Touch Panel (for PS4 platform)
- K: Earphone & Microphone Option
- L: LSB Button
- M: RSB Button
- N: Бутон LB
- O: LT бутон
- P: Гнездо за слушалки
- Q: MACRO Button
- R: Бутон
- S: X Бутон
- T: B бутон
- U: Бутон Y
- V: Бутон RT
- W: RB бутон
Настройка и свързване
Зареждане на устройството
The arcade stick has a built-in 1000mAh rechargeable lithium battery. Connect the included USB Type-C cable to the device and a power source (e.g., computer USB port, USB wall adapter) to charge. The display screen will indicate charging status.
Методи на свързване
The Saitake Arcade Fight Stick supports three primary connection methods:

Image: Visual representation of the Bluetooth switch, 2.4G receiver, and Type-C wired connection port.
- Bluetooth връзка:
- Ensure the arcade stick is powered on and in Bluetooth pairing mode (refer to the display screen for status).
- On your device (Android, iOS, Switch, PS3, PS4, PC with Bluetooth), search for available Bluetooth devices.
- Select "Saitake Arcade Stick" to pair.
- 2.4 GHz безжична връзка:
- Locate the 2.4GHz receiver in the hidden compartment on the back of the arcade stick.
- Plug the 2.4GHz receiver into a USB port on your PC, Switch dock, or PS3/PS4 console.
- The arcade stick should automatically connect to the receiver.
- Кабелна връзка:
- Connect the USB Type-C cable from the arcade stick to a USB port on your PC, Switch dock, or PS3/PS4 console.
- The device will automatically detect the wired connection.
Мултиплатформена съвместимост
The Saitake Arcade Fight Stick is designed for broad compatibility. The image below illustrates the supported systems.

Image: Icons representing Android, iOS, PC, Nintendo Switch, PS3, and PS4, indicating multi-system support.
Инструкция за работа
Обща употреба
Once connected, the arcade stick functions as a standard controller for compatible games. Use the joystick for directional input and the action buttons for in-game commands. The 1.9-inch display screen provides real-time information and allows for various adjustments.
Функция TURBO
The TURBO function allows for rapid, repeated input of a button press. This can be useful in games requiring fast button mashing.
- Standard Turbo: Натиснете ТУРБО button and the desired action button simultaneously to activate. The button will now rapidly repeat its input when held down.
- Автоматично турбо: Some modes may offer an auto-turbo feature where the button repeats without needing to be held. Refer to the on-screen display for specific settings.
- Регулиране на скоростта: The display screen and encoder allow for adjusting the turbo speed settings.
- Деактивиране на турбо режим: Натиснете ТУРБО button and the action button again to deactivate.
Макро функция
The MACRO function allows you to record a sequence of up to 18 keystrokes and assign them to a single button for complex command execution.
- Записване на макрос:
- Натиснете МАКРО button to enter recording mode. The display screen will indicate recording status.
- Perform the desired sequence of button presses and joystick movements.
- Натиснете МАКРО отново, за да спрете записа.
- Assign the recorded macro to a specific button by pressing that button.
- Executing a Macro: Press the assigned button to execute the recorded sequence.
- Изчистване на макрос: Refer to the display screen options or the full manual for instructions on clearing recorded macros.

Image: Visual explanation of the Turbo and Macro functions, highlighting their benefits for efficient gaming.
Display Screen and Audio Jack
- 1.9-inch Functional Display Screen: Use the encoder and buttons near the screen to navigate menus and adjust settings such as volume, lighting effects, brightness, and language. The screen also provides status updates.
- 3.5 мм жак за слушалки: Located on the side of the unit, this jack allows you to connect headphones or a headset for in-game audio and voice chat (if supported by the connected platform).
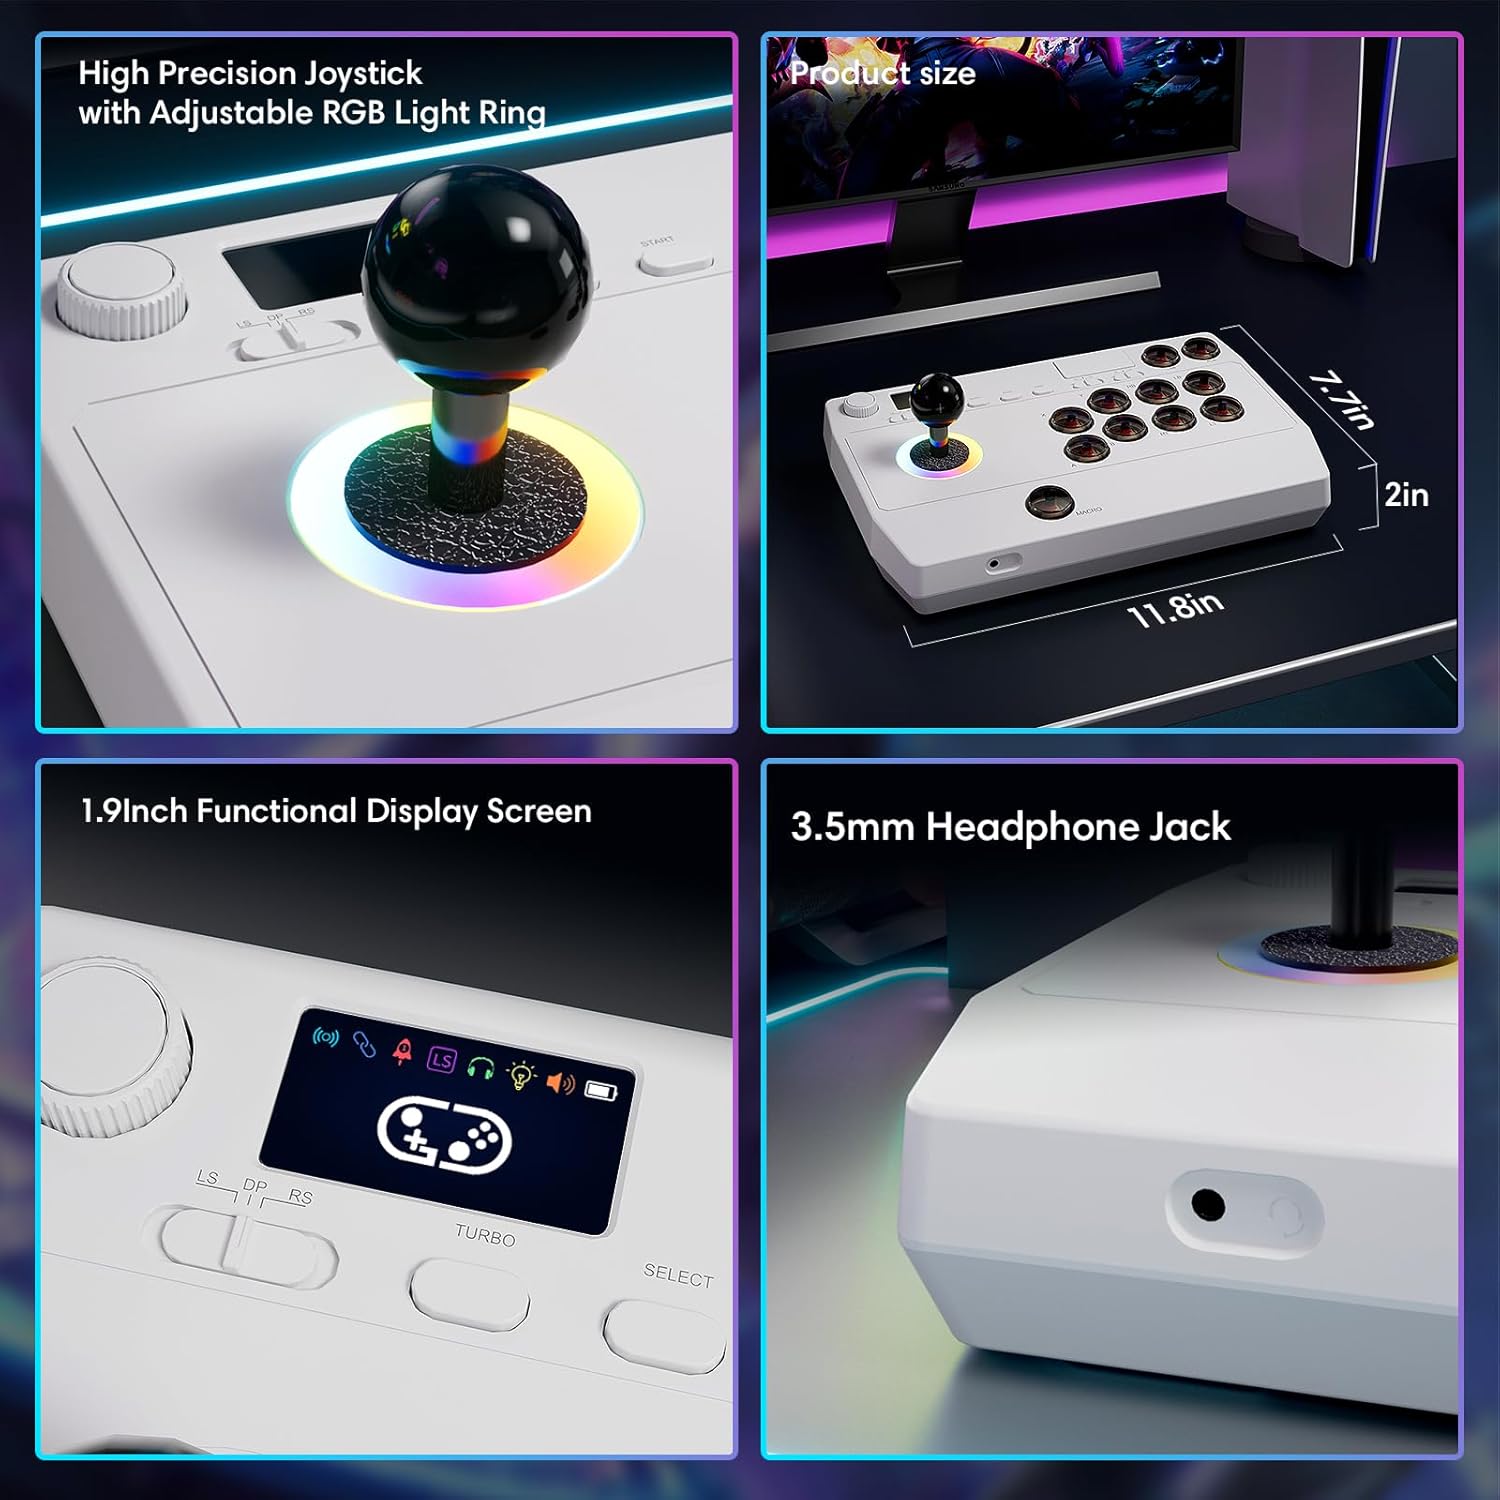
Изображение: Отблизо views of the high-precision joystick with RGB lighting, the 1.9-inch functional display screen, and the 3.5mm headphone jack.
Поддръжка
- Поддържайте устройството чисто, като го избърсвате с мека, суха кърпа.
- Избягвайте излагането на устройството на екстремни температури, влажност или пряка слънчева светлина.
- Do not attempt to disassemble the device, as this may void the warranty.
- Store the 2.4GHz receiver in its designated compartment when not in use to prevent loss.
Отстраняване на неизправности
- Устройството не се включва:
- Ensure the device is fully charged. Connect it to a power source using the USB Type-C cable.
- Не може да се свърже безжично:
- For Bluetooth, ensure the device is in pairing mode and your host device's Bluetooth is enabled.
- For 2.4GHz, ensure the receiver is securely plugged into a USB port and the arcade stick is in 2.4GHz mode.
- Try restarting both the arcade stick and the host device.
- Buttons or joystick are unresponsive:
- Ensure the device is properly connected (wired or wireless).
- Test the device on a different game or platform to rule out software issues.
- Check for any physical obstructions or damage to the buttons or joystick.
- Audio issues with 3.5mm jack:
- Ensure headphones are fully plugged in.
- Check the volume settings on both the arcade stick's display and the host device.
- Test with a different pair of headphones.
Спецификации
| Име на модела | Аркаден стик |
| Марка | Сайтаке |
| Съвместими устройства | Android, iOS, Nintendo Switch 1/2, PC, PlayStation 3/4 |
| Тип контролер | Джойстик |
| Технология за свързване | Bluetooth, USB (2.4GHz wireless, Wired Type-C) |
| Допълнителни функции | Ergonomic, Headphone Jack, Portable, Wireless, 1.9-inch Display Screen, TURBO Function, Macro Function, RGB Lighting |
| Хардуерна платформа | Настолен компютър, игрова конзола, лаптоп, смартфон, таблет, телевизор |
| Източник на захранване | Battery Powered (Built-in 1000mAh Lithium Battery) |
| Размери на артикула | 11.61 x 0.71 x 7.68 инча |
| Цвят | Бяло |
Гаранция и поддръжка
The Saitake Wireless Arcade Fight Stick Joystick comes with a 1 години гаранция от датата на закупуване.
For technical support, troubleshooting assistance, or warranty claims, please contact Saitake customer service through their official website or the retailer where the product was purchased. Please have your purchase receipt and product model information ready.