1. Въведение
The SPL 2Control is a compact and user-friendly stereo monitor controller designed to provide comprehensive control over your digital audio workstation's (DAW) monitoring functions. It ensures high-quality audio reproduction through both studio monitors and headphones, allowing you to hear every detail of your mix. Key features include a precise speaker volume potentiometer, active circuitry for sound integrity, and a unique Crossfeed control for accurate headphone monitoring that simulates a stereo speaker image.
2. Инструкции за безопасност
- Read these instructions thoroughly before operating the device.
- Запазете това ръководство за бъдещи справки.
- Не излагайте устройството на дъжд или влага, за да предотвратите пожар или токов удар.
- Осигурете добра вентилация; не блокирайте вентилационните отвори.
- Използвайте само приставки/аксесоари, посочени от производителя.
- Изключвайте захранващия кабел по време на гръмотевични бури или когато не го използвате за продължителни периоди от време.
- Отнесете всички услуги към квалифициран сервизен персонал.
- Избягвайте поставянето на устройството в близост до източници на топлина, като радиатори, отоплителни уреди, печки или други уреди (включително amplifiers), които произвеждат топлина.
3. Съдържание на пакета
При разопаковане, моля, проверете дали са включени следните елементи:
- 1 x SPL 2Control Module
- 1 x Захранващ кабел
- Това ръководство за потребителя
4. Продуктът свършиview
4.1 Контроли и индикатори на предния панел
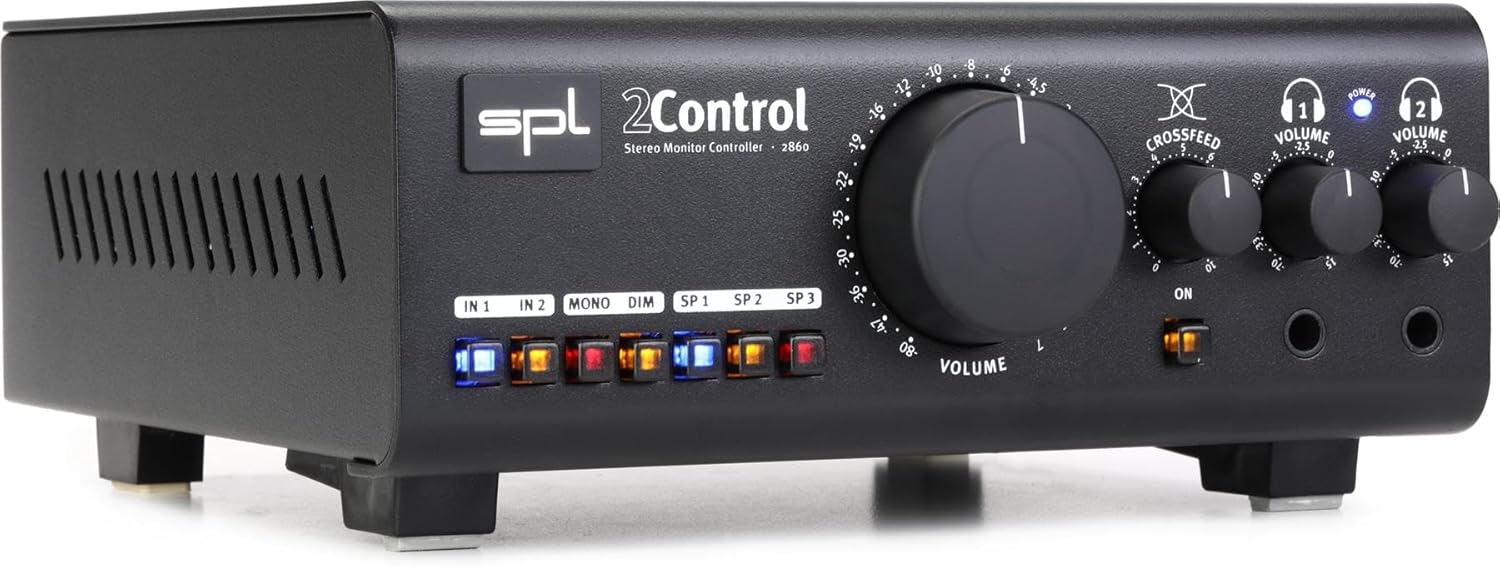
Фигура 1: Front Panel of the SPL 2Control Stereo Monitor Controller.
This image displays the front panel of the SPL 2Control. From left to right, it features input selection buttons (IN 1, IN 2), function buttons (MONO, DIM), speaker output selection buttons (SP 1, SP 2, SP 3), a large central master VOLUME knob, a CROSSFEED knob, and two individual headphone VOLUME knobs with corresponding headphone output jacks. A power indicator LED is visible above the headphone controls.
- IN 1 / IN 2 Buttons: Selects the active stereo input source.
- Бутон МОНО: Sums the stereo signal to mono for compatibility checking.
- DIM бутон: Reduces the output volume by a fixed amount (e.g., -20dB) for temporary level reduction.
- SP 1 / SP 2 / SP 3 Buttons: Selects the active stereo speaker output pair.
- Копче за силата на звука: Master volume control for selected speaker outputs.
- CROSSFEED Knob: Adjusts the stereo panorama for headphone monitoring to simulate a speaker listening environment.
- HEADPHONE VOLUME 1 / 2 Knobs: Независими контроли на силата на звука за двата изхода за слушалки.
- HEADPHONE 1 / 2 Jacks: 1/4-inch stereo headphone outputs.
- LED захранване: Показва, че устройството е включено.
4.2 Rear Panel Connections (Inferred)
The rear panel typically houses the audio input and output connections, as well as the power input. Based on common audio equipment and product specifications, you can expect:
- Аналогови входове: Balanced XLR or TRS inputs for connecting your audio interface or mixer.
- Изходи за високоговорители: Multiple sets of balanced XLR or TRS outputs for connecting up to three pairs of studio monitors.
- Входяща мощност: Connector for the included power cord.
5. Настройка
- Разположение: Position the SPL 2Control on a stable, flat surface, ensuring adequate ventilation around the unit.
- Захранване: Connect the provided power cord to the power input on the rear panel of the 2Control and then to a suitable AC power outlet.
- Входни връзки: Connect the stereo outputs of your audio interface, mixer, or other audio source to the IN 1 and/or IN 2 inputs on the rear panel using balanced XLR or TRS cables.
- Връзки на високоговорителите: Connect your studio monitors to the SP 1, SP 2, and/or SP 3 outputs on the rear panel using balanced XLR or TRS cables. Ensure correct left and right channel connections.
- Headphone Connections: Plug your headphones into the HEADPHONE 1 and/or HEADPHONE 2 jacks on the front panel.
- Първоначално включване: Ensure all volume controls are set to their minimum positions before powering on the unit. Then, connect the power cord to the wall outlet. The POWER LED on the front panel will illuminate.
6. Инструкции за работа
- Избор на вход: Натиснете или В 1 or В 2 button to select your desired audio source. The active button will illuminate.
- Selecting Speaker Outputs: Натиснете SP 1, SP 2, или SP 3 button to route the audio to the corresponding pair of studio monitors. Only one speaker output can be active at a time.
- Регулиране на основната сила на звука: Slowly turn the large ОБЕМ knob clockwise to increase the listening level for the selected speaker outputs. Turn counter-clockwise to decrease.
- Mono Summing: Натиснете МОНО button to sum the stereo signal to mono. This is useful for checking phase compatibility and mix balance. Press again to return to stereo.
- Функция за затъмняване: Натиснете DIM button to temporarily reduce the output volume. This is useful for quick conversations or when you need to lower the volume without losing your main volume setting. Press again to restore the original volume.
- Мониторинг на слушалки:
- Plug your headphones into the desired headphone jack (HEADPHONE 1 or 2).
- Настройте индивида HEADPHONE VOLUME 1 or 2 knob to set the listening level for your headphones.
- Използвайте CROSSFEED knob to adjust the stereo image for headphone listening. Turning it clockwise increases the crossfeed, simulating a more natural speaker-like stereo field by blending the left and right channels slightly.
7. Поддръжка
- Почистване: Използвайте мека, суха кърпа за почистване на външната част на устройството. Не използвайте течни почистващи препарати или разтворители.
- Вентилация: Ensure that the ventilation slots are kept clear of dust and debris to prevent overheating.
- Съхранение: Ако съхранявате устройството за продължителен период от време, изключете го от захранването и го съхранявайте на хладно и сухо място.
8. Отстраняване на проблеми
| проблем | Възможна причина | Решение |
|---|---|---|
| Няма звук от високоговорителите. |
|
|
| Няма звук от слушалките. |
|
|
| Изкривен звук. |
|
|
9. Спецификации
| Характеристика | детайл |
|---|---|
| Име на модела | 2 Control (also known as 2860) |
| Марка | SPL |
| Тип високоговорител | Монитор |
| Препоръчителни употреби | Control, Volume for Monitors |
| Съвместими устройства | Monitors, Speakers |
| Конфигурация на канала за съраунд звук | 2.0 |
| Цвят | черен |
| Включени компоненти | 1 x SPL Control Module |
| Размери на продукта (Д x Ш x В) | 8.66" x 8.46" x 3.15" |
| Тегло на артикула | 7.06 паунда (приблизително 3.2 кг) |
| Източник на захранване | Електрически с кабел |
| Технология за свързване | TRS, XLR |
| Режим на аудио изход | Стерео |
| Тип монтаж | Монтиране на маса |
| производител | Sound Performance Lab |
10. Гаранция и поддръжка
The SPL 2Control Monitor Controller comes with a limited warranty. For specific warranty terms, duration, and conditions, please refer to the documentation provided with your purchase or visit the official SPL website. For technical support, service, or inquiries, please contact the manufacturer, Sound Performance Lab, or your authorized dealer.
производител: Sound Performance Lab


