1. Въведение
The SatLink WS-6909 is a versatile digital meter designed for aligning both DVB-S (satellite) and DVB-T (terrestrial) signals. Featuring a 3.5-inch high-definition TFT LCD screen, it allows users to view actual channels directly on the device, ensuring quick and accurate signal alignment. The meter includes a unique calibration system for optimal performance and supports various satellite and terrestrial signal parameters.
Забележка: DVB-T functionality may not be supported in all regions, including America.
2. Съдържание на пакета
Моля, проверете дали всички изброени по-долу артикули са включени във вашия пакет:
- 1 x SatLink WS-6909 Satellite Meter
- 1 x Захранващ адаптер
- 1 x AV кабел
- 1 x кабел за зарядно устройство за кола
- 1 x силиконов калъф
3. Продуктът свършиview
Familiarize yourself with the components and ports of your SatLink WS-6909 meter.

Фигура 3.1: Отпред view of the SatLink WS-6909 meter, showing the 3.5-inch LCD screen, control buttons, and numeric keypad, alongside its protective orange silicone case.

Фигура 3.2: Отдолу view of the device, featuring the main power switch, DC power input port, and a USB port for software upgrades.

Фигура 3.3: отстрани view of the meter, illustrating the AV IN and AV OUT ports for connecting external video sources or displays.
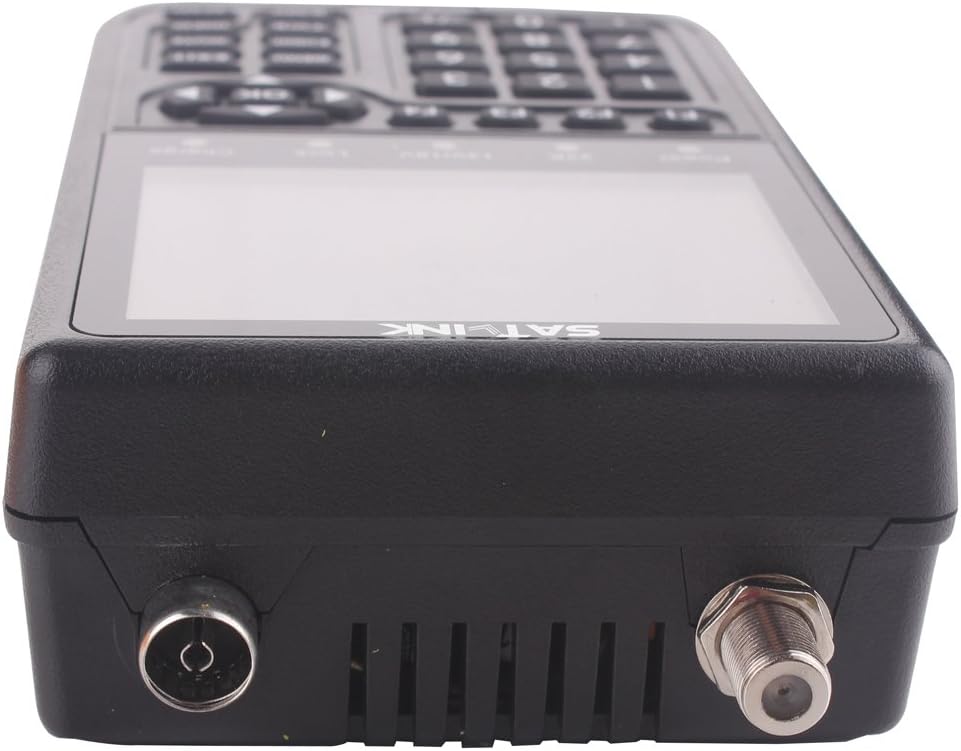
Фигура 3.4: Топ view of the device, displaying the F-connector for satellite input and the standard antenna input for terrestrial signals.
4. Настройка
4.1 Зареждане на устройството
- Connect the provided Power Adaptor to the DC input port on the bottom of the meter.
- Plug the Power Adaptor into a standard electrical outlet. The 'Charge' indicator light on the device will illuminate.
- Allow the device to charge fully before initial use. A full charge provides approximately 4 hours of operating time.
- Alternatively, use the Car Charger Cable to charge the device in a vehicle.
4.2 Първоначално включване
- Уверете се, че устройството е адекватно заредено.
- Flip the main power switch located on the bottom of the meter to the 'ON' position.
- The device will power on and perform an automatic calibration for optimal performance.
4.3 Connecting Antennas/LNBs
- For satellite signal reception (DVB-S), connect the LNB cable from your satellite dish to the F-connector input on the top of the meter.
- For terrestrial signal reception (DVB-T), connect your terrestrial antenna cable to the standard antenna input on the top of the meter.
5. Инструкции за работа
5.1 Основна навигация
- Използвайте МЕНЮ бутон за достъп до главното меню.
- Navigate through menu options using the directional arrow buttons (НАГОРЕ/НАДОЛУ/НАЛЯВО/НАДЯСНО).
- Натиснете OK button to confirm selections or enter sub-menus.
- Използвайте EXIT бутон, за да се върнете към предишния екран или да излезете от менюто.
- The numeric keypad can be used for direct input of values such as frequencies or channel numbers.
5.2 DVB-S (Satellite) Signal Finding
- From the main menu, select the DVB-S measurement mode.
- Configure parameters such as satellite, transponder frequency, symbol rate, and polarity. These settings can be modified by the user.
- The meter supports DISEQC 1.0, 1.1, 1.2, and 22kHz Tone. Adjust these settings as required for your LNB configuration.
- The meter provides LNB power supply options of 18V/13V (maximum 400mA).
- Align your satellite dish while observing the signal strength, quality, BER (Bit Error Rate), S/N (Signal-to-Noise ratio), and PWR (Power) on the 3.5-inch LCD screen.
- The device will provide a sound and light alarm when a signal is locked.
- The meter can automatically calculate Azimuth (AZ) and Elevation (EL) angles to assist with dish alignment.
- Search modes include Auto, Blind, and Manual.
5.3 DVB-T (Terrestrial) Signal Finding
- From the main menu, select the DVB-T measurement mode.
- Configure the desired frequency range.
- The meter supports ANT power supply options of 5V/12V/24V for active antennas.
- Align your terrestrial antenna while observing the signal strength, quality, MER (Modulation Error Ratio), S/N (Signal-to-Noise ratio), and PWR (Power) on the LCD screen.
- The meter supports multichannel checks and demodulation types including QPSK, 16QAM, and 64QAM.
- Search modes include Auto and Manual.
5.4 Надстройки на софтуера
The USB port on the bottom of the device is used for software upgrades. Refer to the manufacturer's webсайт за най-новия софтуер и инструкции.
6. Поддръжка
6.1 Почистване
- Wipe the device exterior with a soft, dry cloth.
- Не използвайте течни почистващи препарати или разтворители, тъй като те могат да повредят устройството.
6.2 Грижи за батерията
- За да удължите живота на батерията, избягвайте излагането на устройството на екстремни температури.
- Recharge the battery regularly, even if the device is not in frequent use.
6.3 Софтуерни актуализации
Периодично проверявайте официалните данни на производителя website for available software updates. Updating the firmware can improve performance and add new features.
7. Отстраняване на проблеми
| проблем | Възможна причина | Решение |
|---|---|---|
| Устройството не се включва | Low battery; Power switch off; Faulty power adapter | Charge the battery; Ensure power switch is ON; Try a different power source |
| No signal detected (DVB-S) | Incorrect satellite/transponder settings; LNB not powered; Dish misalignment; Cable issue | Verify satellite and transponder settings; Check LNB power (13/18V); Adjust dish alignment; Inspect cable connections |
| No signal detected (DVB-T) | Incorrect frequency; Antenna not powered (if active); Antenna misalignment; Regional DVB-T incompatibility | Verify frequency settings; Check ANT power (5/12/24V); Adjust antenna alignment; Confirm DVB-T support in your region |
| Лошо качество на сигнала | Fine-tuning needed; Obstructions; Damaged LNB/antenna | Make small adjustments to alignment; Clear line of sight; Replace faulty components if necessary |
| Екранът е замръзнал или не реагира | Софтуерна грешка | Perform a hard reset by turning the power switch OFF and then ON again. If persistent, consider a software upgrade. |
8. Спецификации
- Дисплей: 3.5-инчов TFT LCD екран с висока разделителна способност
- Батерия: 8.4V/3000mAh Li-ion, Max Operating Time: 4 hours
- DVB-S Input Frequency: 950-2150MHz
- DVB-S Input Level: -65 до -25 dBm
- DVB-S Input Impedance: 75Ω
- DISEQC Support: 1.0, 1.1, 1.2 and 22kHz Tone
- LNB Power Supply: 18V/13V (I Max. 400mA)
- DVB-T Frequency Range: 46MHz-862MHz
- DVB-T Level Range: 40dBµV-110dBµV
- DVB-T Input Impedance: 75Ω
- DVB-T Demodulation: QPSK, 16QAM, 64QAM
- ANT Power Supply: 5V/12V/24V
- Видове измервания: Signal strength, quality, BER, S/N, PWR (DVB-S); Signal strength, quality, MER, S/N, PWR (DVB-T)
- Режими на търсене: Auto, Blind, Manual
- Размери на продукта: 3.54 x 1.77 x 6.46 инча
- Тегло на артикула: 1.76 паунда
- Номер на модела: WS6909
9. Гаранция и поддръжка
For technical assistance, warranty information, or customer support, please contact your original retailer or refer to the manufacturer's official website for contact details. Please have your product model number (WS 6909) and purchase information ready when seeking support.