1. Въведение
This manual provides essential information for the installation, operation, and maintenance of the HP 5412-92G-PoE+-2XG v2 zl Switch. Please read this manual thoroughly before using the device to ensure proper functionality and safety. This product is a high-performance, modular network switch designed for enterprise-level networking environments, offering extensive Power over Ethernet (PoE+) capabilities and high-speed uplink options.
2. Продуктът свършиview
The HP 5412-92G-PoE+-2XG v2 zl Switch is a robust, manageable network switch chassis featuring 92 PoE+ ports and 10 expansion slots. It supports 10/100/1000BASE-T connectivity and is designed for demanding network infrastructures.
Ключови характеристики:
- 92 Gigabit Ethernet ports with Power over Ethernet Plus (PoE+) support.
- 10 expansion slots for flexible network configuration.
- Manageable switch chassis for advanced network control.
- Supports 10/100/1000BASE-T connectivity.
- RoHS Compliance for environmental standards.
Продукт Views:
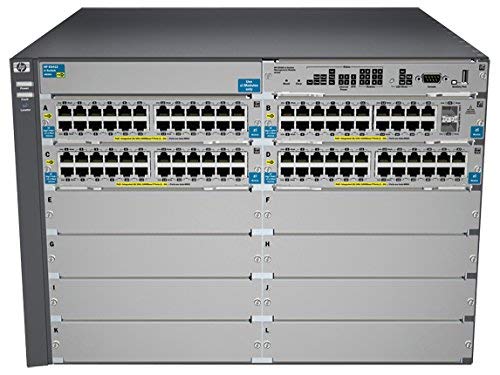
Фигура 2.1: Отпред view of the HP 5412-92G-PoE+-2XG v2 zl Switch, showing the modular chassis with multiple port modules installed.

Фигура 2.2: Ъглова предна част view of the switch, highlighting the port density and modular design.

Фигура 2.3: A slightly different angled front view, providing another perspective of the switch's physical layout.

Фигура 2.4: Задна view of the switch, illustrating the dual power supply bays and ventilation.
3. Настройка и инсталация
Proper installation is crucial for the optimal performance and longevity of your HP switch. Follow these steps carefully:
- Разопаковане и проверка: Carefully remove the switch from its packaging. Inspect for any signs of damage during transit. Report any damage to your supplier immediately.
- Монтаж на стойка: The switch is designed for standard 19-inch rack mounting. Secure the switch using appropriate rack-mount kits (sold separately or included). Ensure adequate space for airflow around the unit.
- Захранване: Connect the power cords to the power supply units at the rear of the switch and then to a grounded AC power source. The switch supports redundant power supplies for enhanced reliability.
- Module Installation (if applicable): If your switch requires additional modules (e.g., SFP+ uplinks, additional PoE+ ports), refer to the specific module installation guide. Ensure modules are seated firmly in their respective slots.
- Мрежова свързаност: Connect your network devices (servers, workstations, access points) to the appropriate Ethernet ports on the switch using standard RJ-45 cables. For PoE-powered devices, ensure they are compatible with PoE+ standards.
- Първоначална конфигурация: Connect a console cable to the switch's console port and a terminal emulator on a computer for initial configuration. Refer to the HP ProVision ASIC-based Switch Management and Configuration Guide for detailed software setup.
Забележка: Always ensure proper grounding and ventilation to prevent electrical hazards and overheating.
4. Инструкции за работа
Once the switch is physically installed and powered on, it will begin its boot sequence. The following outlines basic operational aspects:
- Включване: After connecting power, the switch will automatically power on. Observe the system status LEDs for boot progress.
- LED индикатори:
- Системен светодиод: Indicates overall system status (e.g., green for normal operation, amber for fault).
- Светодиоди на порта: Indicate link status, activity, and PoE status for each port. Consult the switch's LED guide for specific patterns.
- Управление на мрежата: The switch can be managed via a command-line interface (CLI) through the console port, Telnet, or SSH. It also supports web-based management (GUI) and SNMP for network monitoring and control.
- PoE+ Functionality: The 92 PoE+ ports automatically detect and provide power to connected PoE-compatible devices, such as IP phones, wireless access points, and IP cameras. Ensure the total power budget is not exceeded.
- Актуализации на фърмуера: Редовно проверявайте поддръжката на HP webсайт за най-новите актуализации на фърмуера, за да се осигури оптимална производителност, сигурност и достъп до нови функции.
5. Поддръжка
Regular maintenance helps ensure the reliability and longevity of your HP switch.
- Почистване: Keep the switch and its ventilation openings clean and free of dust. Use a soft, dry cloth for external cleaning. Do not use liquid or aerosol cleaners directly on the unit.
- Контрол на околната среда: Ensure the operating environment maintains appropriate temperature and humidity levels as specified in the technical specifications. Avoid placing the switch in direct sunlight or near heat sources.
- Управление на кабели: Organize network and power cables to prevent strain, accidental disconnections, and to maintain proper airflow.
- Актуализации на фърмуера и софтуера: Periodically check for and apply the latest firmware and software updates from the official HP support portal. This ensures security patches, bug fixes, and performance enhancements are implemented.
- Конфигурация на резервното копие: Regularly back up your switch configuration files to an external storage device. This allows for quick restoration in case of a system reset or failure.
6. Отстраняване на проблеми
Този раздел предоставя решения на често срещани проблеми, с които може да се сблъскате.
| проблем | Възможна причина | Решение |
|---|---|---|
| Превключвателят не се включва. | No power to the unit; faulty power supply; power cord not securely connected. | Verify power cord connection. Check power outlet. Ensure power supplies are correctly seated. Test with a known good power cord/outlet. |
| Няма мрежова свързаност на порт. | Incorrect cable; faulty cable; port disabled; incorrect VLAN configuration; device not powered (for PoE). | Check cable type and integrity. Verify port status via CLI/GUI. Ensure correct VLAN assignment. For PoE, check device power requirements and switch PoE budget. |
| PoE устройството не получава захранване. | Device not PoE compatible; cable issue; switch PoE budget exceeded; port disabled for PoE. | Confirm device PoE compatibility. Check cable. Monitor switch PoE budget. Enable PoE on the port if disabled. |
| Бавна мрежова производителност. | Network congestion; duplex mismatch; faulty cable; outdated firmware. | Monitor network traffic. Verify duplex settings on switch and connected device. Replace suspected cables. Update switch firmware. |
For more advanced troubleshooting, consult the comprehensive HP switch documentation available on the official HP support webсайт или се свържете с техническата поддръжка.
7. Спецификации
Technical specifications for the HP 5412-92G-PoE+-2XG v2 zl Switch (Model J9532A):
- Номер на модела: J9532A
- марка: HP
- Брой портове: 92 (PoE+)
- Тип интерфейс: PoE+ (Power over Ethernet Plus)
- Скорост на трансфер на данни: 1 Gigabits Per Second (10/100/1000BASE-T)
- Размери на продукта: 17.5 x 17.75 x 12.1 инча (44.45 x 45.09 x 30.73 см)
- Тегло на артикула: 75.4 паунда (34.2 кг)
- UPC: 751889108768
- Първи налични: 20 юни 2019 г
- производител: hp
8. Гаранция и поддръжка
Този продукт се предлага като артикул от Amazon Renewed. Като такъв, той е подкрепен от Подновена гаранция на Amazon, which ensures eligibility for replacement or refund if you are not satisfied with your purchase.
- Политика за връщане: Eligible for 90-day easy returns.
- Поддръжка на клиенти: For assistance, please refer to the customer support options provided by the seller, Network Hardware Depot, or Amazon Renewed.
- Поддръжка на производителя: For original manufacturer documentation and support resources, visit the official HP support webсайт.