1. Въведение и надview
The Escort EDM 1111A is a versatile digital multimeter designed for accurate measurement of various electrical parameters. This device is essential for electricians, technicians, and hobbyists for testing circuits, components, and power sources. It features a clear digital display and a rotary dial for selecting different measurement functions.

The Escort EDM 1111A Digital Multimeter with red and black test leads connected, ready for use.
Ключовите функции включват:
- DC Voltage (DCV) measurement
- AC Voltage (ACV) measurement
- DC Current (DCA) measurement
- AC Current (ACA) measurement
- Измерване на съпротивление (Ω).
- Capacitance (CX) measurement
- Diode and Transistor (hFE) testing
2. Настройка
2.1 Инсталиране на батерията
The Escort EDM 1111A requires a DC 9V 006P battery for operation. To install or replace the battery:
- Уверете се, че мултицетът е изключен.
- Намерете отделението за батерии на гърба на устройството.
- Carefully slide open or unscrew the battery cover.
- Insert a new 9V 006P battery, observing the correct polarity (+/-).
- Поставете здраво капака на батерията.

Задната част view of the Escort EDM 1111A Digital Multimeter, showing the battery compartment cover and the product label.
2.2 Свързване на измервателни сонди
The multimeter comes with two test leads, typically one red (positive) and one black (negative/common). Proper connection is crucial for accurate and safe measurements.
- За повечето обемиtage, resistance, and low current measurements, connect the black lead to the 'COM' (Common) jack.
- Connect the red lead to the 'V-Ω-mA' jack for voltage, съпротивление и милиampере текущите измервания.
- За измервания на висок ток (до 10A), свържете червения кабел към жака „10A“. Always ensure the correct jack is used to prevent damage to the meter or circuit.

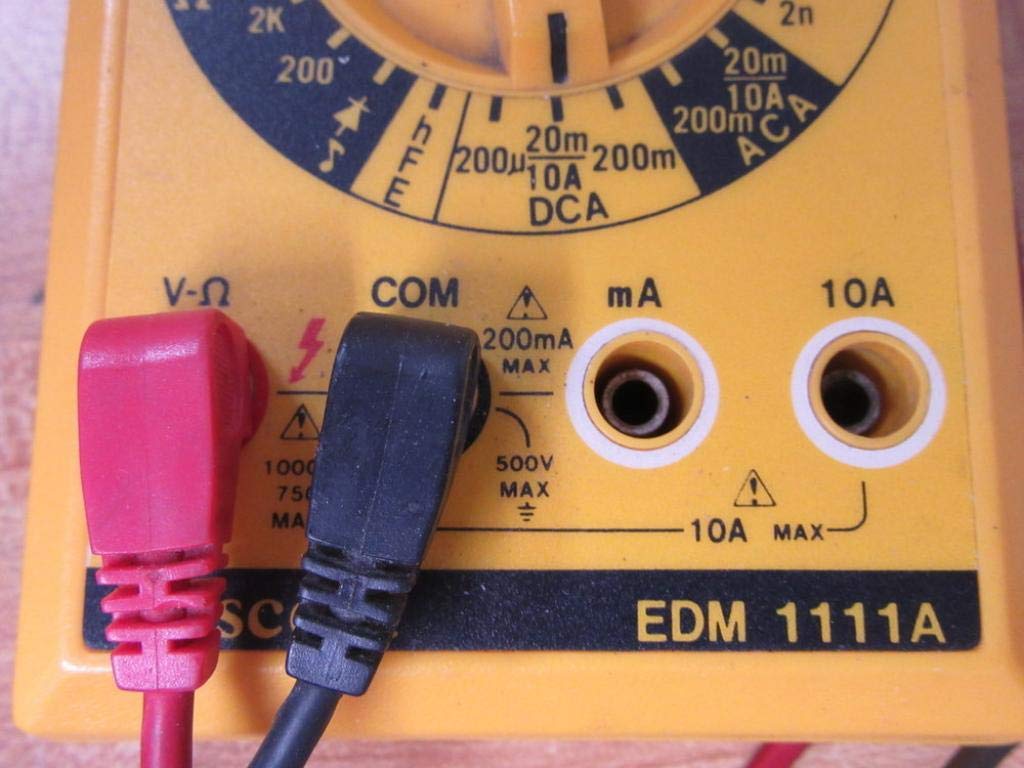
A closer look at the input jacks (V-Ω, COM, mA, 10A) and the lower portion of the rotary dial, indicating current measurement ranges.

The red and black test probes (leads) used with the Escort EDM 1111A Digital Multimeter, featuring pointed tips for electrical contact.
3. Инструкции за работа
Before taking any measurements, ensure the test leads are correctly connected and the rotary dial is set to the appropriate function and range.

Подробно view of the rotary selector dial on the Escort EDM 1111A Digital Multimeter, displaying various measurement functions such as DCV, ACV, Ω, DCA, ACA, and CX.
3.1 Измерване на DC Voltagд (DCV)
- Set the rotary dial to the desired DCV range (e.g., 200m, 2, 20, 200, 1000). Choose a range higher than the expected voltage.
- Connect the red lead to the positive (+) side of the circuit and the black lead to the negative (-) side.
- Прочетете томаtage стойност на дисплея.
3.2 Измерване на AC Voltagд (ACV)
- Set the rotary dial to the desired ACV range (e.g., 200m, 2, 20, 200, 750). Choose a range higher than the expected voltage.
- Свържете измервателните сонди през ACtage source. Polarity does not matter for AC voltage.
- Прочетете томаtage стойност на дисплея.
3.3 Измерване на съпротивление (Ω)
- Уверете се, че веригата или компонентът е изключен от захранването, преди да измерите съпротивлението.
- Set the rotary dial to the desired Ω range (e.g., 200, 2K, 20K, 200K, 2M, 20M, 200M).
- Свържете измервателните проводници към компонента, който ще се измерва.
- Прочетете стойността на съпротивлението на дисплея.
3.4 Measuring DC Current (DCA)
- Уверете се, че веригата е изключена от захранването.
- Set the rotary dial to the desired DCA range (e.g., 200µ, 2m, 20m, 200m, 10A).
- Важно: For currents up to 200mA, use the 'V-Ω-mA' jack for the red lead. For currents up to 10A, use the '10A' jack.
- Break the circuit and connect the multimeter in series with the load. The current must flow through the multimeter.
- Включете отново веригата и отчетете текущата стойност.
3.5 Measuring AC Current (ACA)
- Уверете се, че веригата е изключена от захранването.
- Set the rotary dial to the desired ACA range (e.g., 200µ, 2m, 20m, 200m, 10A).
- Важно: For currents up to 200mA, use the 'V-Ω-mA' jack for the red lead. For currents up to 10A, use the '10A' jack.
- Прекъснете веригата и свържете мултицета последователно с товара.
- Включете отново веригата и отчетете текущата стойност.
3.6 Measuring Capacitance (CX)
- Уверете се, че кондензаторът е напълно разреден преди тестване.
- Set the rotary dial to the CX range (e.g., 2n, 20n, 200n, 2µ, 20µ).
- Свържете измервателните сонди към клемите на кондензатора.
- Прочетете стойността на капацитета на дисплея.
3.7 Diode and Transistor (hFE) Testing
Refer to the specific markings on the dial for diode and transistor testing functions. Typically, diode test mode allows checking the forward voltage drop of a diode, and hFE mode is used for measuring the DC current gain of transistors.
4. Поддръжка
4.1 Смяна на батерията
Replace the 9V 006P battery when the low battery indicator appears on the display or if the multimeter fails to power on. Follow the instructions in Section 2.1.
4.2 Почистване
To clean the multimeter, use a soft, damp cloth. Do not use abrasive cleaners or solvents, as they may damage the casing or display. Ensure the device is turned off and disconnected from any circuits before cleaning.
4.3 Съхранение
When not in use for extended periods, store the multimeter in a cool, dry place, away from direct sunlight and extreme temperatures. Consider removing the battery to prevent leakage, which could damage the internal components.
5. Отстраняване на проблеми
| проблем | Възможна причина | Решение |
|---|---|---|
| Няма дисплей или дисплеят е слаб | Изтощена или изтощена батерия | Replace the 9V 006P battery. |
| Неправилни показания | Incorrect range selected Poor lead connection Damaged test leads Incorrect input jack used | Изберете подходящия диапазон. Ensure leads are firmly connected. Inspect and replace damaged leads. Verify leads are in the correct V-Ω-mA or 10A jack. |
| Показва се "OL" (претоварване) | Измерването надвишава избрания диапазон | Преминете към по-висок диапазон. |
| Няма звуков сигнал за непрекъснатост | Continuity function not selected Отворена верига | Ensure dial is on continuity/diode test. Check the circuit for breaks. |
6. Спецификации
| Параметър | Стойност |
|---|---|
| Модел | EDM 1111A |
| Размери на продукта (Д x Ш x В) | 8 x 4 x 2 инча |
| Тегло на артикула | 1.84 паунда |
| Източник на захранване | DC 9V 006P Battery |
| Тип на измерване | Мултиметър |
| производител | Ескорт |
| Дата на първа наличност | 21 ноември 2019 г |
| DC Voltage Обхвати | 200mV, 2V, 20V, 200V, 1000V |
| AC Voltage Обхвати | 200mV, 2V, 20V, 200V, 750V |
| Диапазони на постоянен ток | 200µA, 2mA, 20mA, 200mA, 10A |
| Диапазони на променлив ток | 200µA, 2mA, 20mA, 200mA, 10A |
| Диапазони на съпротивление | 200Ω, 2KΩ, 20KΩ, 200KΩ, 2MΩ, 20MΩ, 200MΩ |
| Capacitance Ranges | 2nF, 20nF, 200nF, 2µF, 20µF |
7. Гаранционна информация
For specific warranty details regarding your Escort EDM 1111A Digital Multimeter, please refer to the documentation provided at the time of purchase or contact the manufacturer directly. Warranty terms typically cover defects in materials and workmanship under normal use.
8. Поддръжка на клиенти
If you encounter any issues or have questions not covered in this manual, please contact Escort customer support. Have your product model number (EDM 1111A) and serial number (if applicable, found on the back label) ready when contacting support for faster assistance.
The product label on the back of the Escort EDM 1111A, indicating 'DIGITAL MULTIMETER DC 9V 006P BATTERY', serial number, and 'MADE IN TAIWAN R.O.C.'.


