1. Въведение
Thank you for choosing the ETA Falco Smart Robot Vacuum Cleaner with Mopping Function. This manual provides essential information for the safe and efficient operation, maintenance, and troubleshooting of your device. Please read this manual thoroughly before using the product and keep it for future reference.
Важна информация за безопасност
- Always ensure the robot is placed on a stable, level surface.
- Пазете устройството далеч от вода и влага.
- Не позволявайте на деца или неупълномощени лица да работят с робота.
- Use only the original charging adapter and accessories provided.
- Before cleaning or maintenance, ensure the robot is powered off and unplugged from the charging station.
- Avoid operating the robot near open flames or flammable materials.
2. Продуктът свършиview
Компоненти и контроли
Familiarize yourself with the main parts and controls of your ETA Falco Smart robot vacuum cleaner.
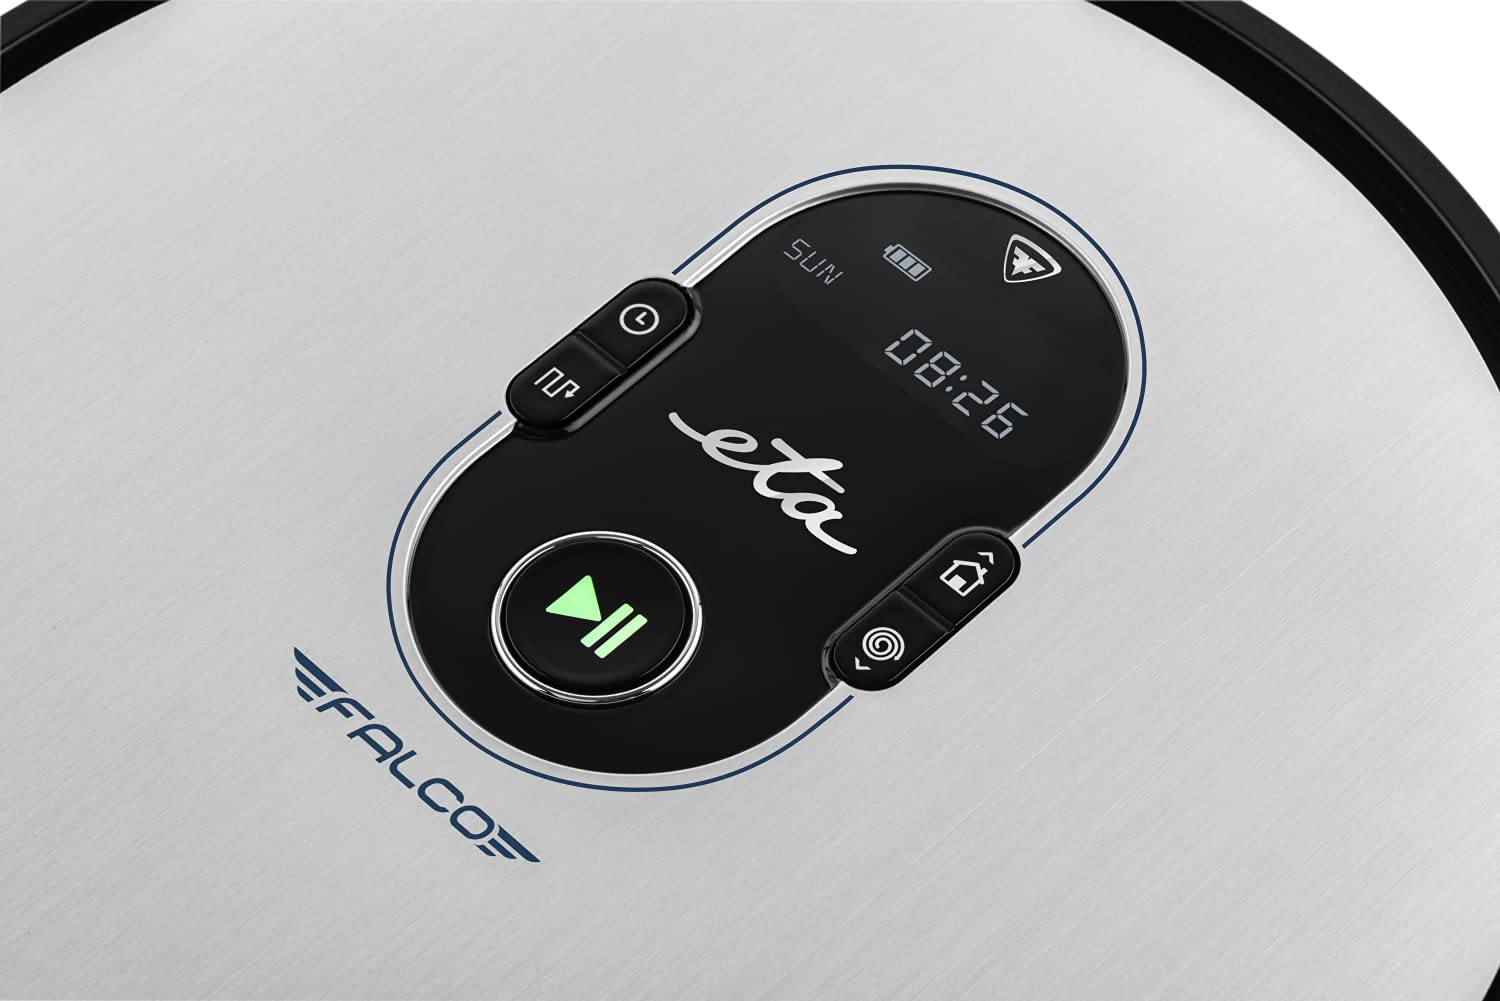
Изображение 2.1: Top panel controls. This image shows the main control panel on the top of the robot, including buttons for power, scheduling, and return to charging station, along with a digital display.

Изображение 2.2: Долна страна view. This image displays the bottom of the robot, highlighting the main brush, two side brushes, and the mop attachment.

Изображение 2.3: Underside diagram. This diagram labels the key components on the robot's underside, including the side brushes, main brush, and mop attachment.
3. Съдържание на пакета
При разопаковане, моля, уверете се, че всички следващи елементи са налични:
- ETA Falco Smart Robot Vacuum Cleaner
- Станция за зареждане
- Адаптер за зареждане
- Дистанционно управление
- 2x Spare Side Brushes
- Special Rotary and Lamella Brush
- 2x Cleaning Cloths (Mop Pads)
- Резервен HEPA филтър
- Mop Attachment with 300 ml Water Tank
- Виртуална стена
4. Настройка
4.1 Първоначално зареждане
- Place the charging station against a wall in an open area, ensuring there are no obstacles within 1 meter to the sides and 2 meters in front.
- Connect the charging adapter to the charging station and plug it into a power outlet.
- Place the robot vacuum cleaner on the charging station. Ensure the charging contacts align. The robot will begin charging automatically. A full charge takes approximately 5 hours.
4.2 Монтиране на странични четки
Attach the side brushes to the designated posts on the underside of the robot by pressing them down until they click into place. Ensure the 'L' and 'R' markings on the brushes match the corresponding markings on the robot.
4.3 Connecting to the ETA SMART App
The ETA SMART app enhances the functionality of your robot. Download the app from your smartphone's app store. Follow the in-app instructions to connect your robot to your home Wi-Fi network and pair it with the app.
4.4 Setting up the Virtual Wall
The virtual wall creates an invisible barrier to restrict the robot's access to certain areas. Place the virtual wall device on the floor where you want to create a boundary. Ensure the infrared beam is directed towards the area you wish to block. The robot will detect this beam and avoid crossing it.

Изображение 4.1: Robot with charging station and virtual wall. This image shows the robot positioned near its charging station, with a virtual wall device placed nearby to illustrate its function.
5. Инструкции за работа
5.1 Режими на почистване
The ETA Falco Smart offers four distinct cleaning modes:
- УМНО: General cleaning mode for optimal coverage.
- КЛАСИКА: Standard cleaning pattern.
- РЪБ: Почиства по стените и ръбовете на мебелите.
- МЯСТО: Концентрирано почистване в определена зона.
You can select these modes via the ETA SMART app or the remote control.
5.2 Планиране на почистване
Use the ETA SMART app to set a cleaning schedule for your robot. You can program specific times and days for the robot to automatically start cleaning.
5.3 Ръчно управление
You can manually control the robot's movement and functions using the remote control or the ETA SMART app. The app also allows you to monitor cleaning activity, battery charge, and view cleaning routes.

Изображение 5.1: ETA Smart App features. This image displays the ETA Smart App interface on a smartphone, highlighting features such as remote control, cleaning history, activity monitoring, battery status, cleaning modes (SMART, CLASSIC, EDGE, SPOT), cleaning schedule, mopping intensity control, and suction power adjustment.
5.4 Функция за почистване
- Fill the 300 ml water tank with clean water. Do not use detergents or cleaning solutions that are not approved for robot vacuums.
- Attach a clean mop pad to the mop attachment.
- Slide the mop attachment into the designated slot on the underside of the robot.
- Стартирайте цикъл на почистване. Роботът ще прахосмуче и почиства едновременно.
6. Поддръжка
Редовната поддръжка осигурява оптимална производителност и удължава живота на вашата роботизирана прахосмукачка.
6.1 Почистване на контейнера за прах и филтъра
- Натиснете бутона за освобождаване на кошчето за прах и го извадете.
- Отворете контейнера за прах и изсипете съдържанието му в кошчето за боклук.
- Remove the HEPA filter and primary filter. Tap them gently to remove dust. If washable, rinse under running water and allow to air dry completely before reinserting.
- Избършете вътрешността на контейнера за прах със суха кърпа.
- Reassemble the filters and dust bin, then reinsert into the robot.
6.2 Почистване на главната четка
- Обърнете робота.
- Свалете капака на главната четка, като натиснете освобождаващите езичета.
- Извадете основната четка.
- Use the cleaning tool (if provided) or scissors to remove hair and debris tangled around the brush.
- Clean the brush compartment.
- Поставете обратно основната четка и затворете капака.
6.3 Почистване на страничните четки
Periodically check the side brushes for tangled hair or debris. If necessary, remove them by gently pulling upwards and clean them. Replace worn or damaged brushes with the spare ones provided.
6.4 Почистване на подложката за моп и резервоара за вода
After each mopping session, remove the mop pad and wash it thoroughly. Empty any remaining water from the water tank and rinse it. Allow both to air dry completely before storing or reusing.
6.5 Почистване на сензори
Wipe the anti-drop sensors, bumper sensors, and charging contacts on the robot and charging station with a clean, dry cloth to ensure proper function.
7. Отстраняване на проблеми
Ако вашата роботизирана прахосмукачка срещне проблем, вижте следните често срещани проблеми и решения:
| проблем | Възможна причина | Решение |
|---|---|---|
| Роботът не се включва | Ниска батерия; Изключено захранване | Заредете робота; Уверете се, че захранващият ключ е ВКЛ. |
| Роботът не се зарежда | Charging contacts dirty; Charging station unplugged | Clean charging contacts; Ensure charging station is plugged in |
| Лоша ефективност на почистване | Контейнерът за прах е пълен; Четките са заплетени; Филтърът е запушен | Изпразнете контейнера за прах; Почистете четките; Почистете/сменете филтъра |
| Роботът често засяда | Obstacles on floor; Sensors dirty | Clear floor of cables/small items; Clean sensors |
| Virtual wall not working | Virtual wall batteries low; Incorrect placement | Replace batteries; Adjust virtual wall position |
Ако проблемът продължава след изпробване на тези решения, моля, свържете се с отдела за обслужване на клиенти.
8. Спецификации
Technical specifications for the ETA Falco Smart Robot Vacuum Cleaner (Model ETA251590000):
| Характеристика | детайл |
|---|---|
| производител | ETA |
| Размери на продукта (Д x Ш x В) | 32.5 х 33.5 х 7.5 см |
| Тегло | 250 грама |
| Номер на модела на артикул | ETA251590000 (T2261) |
| Цвят на модела | Синьо |
| Материал | Пластмаса |
| Тип мощност | Захранван от батерия |
| Voltage | 3 Volts (14.4V Li-ion battery, 2400 mAh) |
| Брой артикули в опаковката | 1 |
| Специални функции | Pet brush compatibility, Smart App control, Floating brush system, HEPA filter, Virtual wall |
| Включени компоненти | Battery, Filter, Charging station, Adapter, Remote control, Side brushes, Rotary brush, Cleaning cloths, Mop attachment, Virtual wall |
| Състав на батерията | Литиево-йонна |
| Живот на батерията | До 120 минути |
| Време за зареждане | Прибл. 5 часа |
| Препоръка за повърхност | Ламинат |
| Тип контролер | Контрол на приложението |
| Наличност на резервни части | Недостъпна информация за резервни части |
9. Гаранция и поддръжка
For warranty information, product support, or to inquire about spare parts, please refer to the warranty card included with your purchase or visit the official ETA webсайт. Запазете доказателството си за покупка за гаранционни рекламации.


