1. Настройка
1.1 Разопаковане и първоначална подготовка
Carefully remove all components from the packaging. Ensure all items listed in the "In The Box" section are present.

Image: All components of the Lockin Smart Lock Box L1, including the lockbox, mounting hardware, and user manual.
The package includes the Lockin Smart Lock Box L1, 4 back silicone plugs, 2 top silicone plugs, 8 anchoring screws, 4 anchoring screws, and 4 setscrews. An Allen wrench is also provided for installation.
Video: Instructions on how to install the batteries into the Lockin Smart Lock Box L1.
1.2 Инсталиране на батерията
Open the lock box to access the battery compartment. Insert 2 AA batteries (included) ensuring correct polarity. Secure the battery cover plate using the provided small screws and Allen wrench. This step is crucial for maintaining the waterproof seal of the device.
Image: The interior of the Lockin Smart Lock Box L1, highlighting the battery compartment and the battery cover plate.
Video: Detailed guide on how to install the batteries and secure the battery cover for the Lockin Smart Lock Box L1.
1.3 Изтегляне на приложение и сдвояване на устройства
Download the "Lockin Home" app from the Google Play Store or Apple App Store. Alternatively, scan the QR code provided in the user manual. Ensure your smartphone's Bluetooth is enabled. Open the app, create an account, and follow the on-screen instructions to add your Lockin Smart Lock Box L1. The app will guide you through the pairing process. The lockbox will beep upon successful pairing.
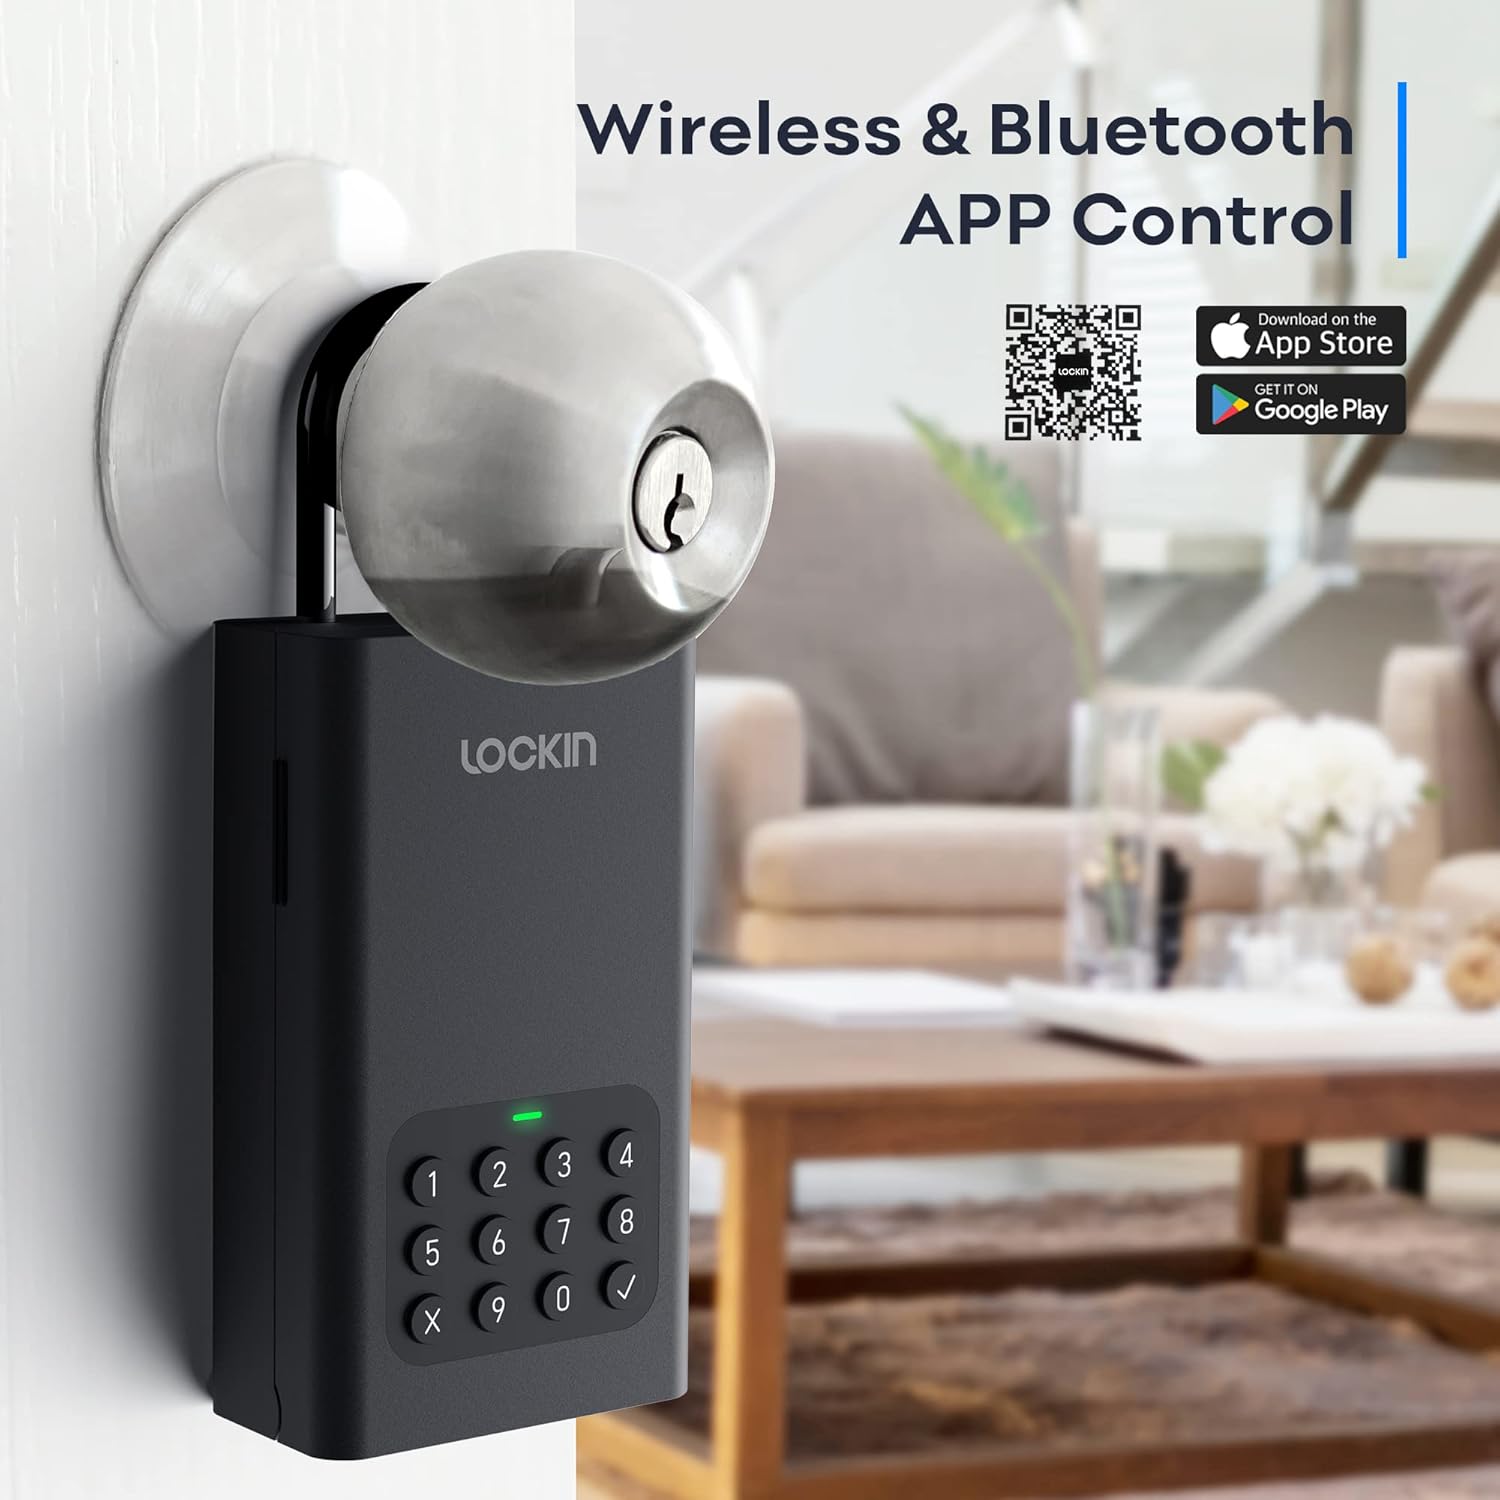
Image: The Lockin Smart Lock Box L1 next to a smartphone displaying the Lockin Home app interface, showing the app download options.
Важно: Only one account can be attached to the lockbox at a time. If you need to transfer ownership or reset, remove the device from your current account in the app.
Video: Step-by-step guide on how to add and remove the Lockin Smart Lock Box L1 device from the mobile application.
Video: Instructions on how to pair the G30 WiFi Bridge with your mobile device, which can extend remote access capabilities (Bridge sold separately).
2. Инструкции за работа
2.1 Unlocking via Bluetooth App
Ensure your smartphone's Bluetooth is on and you are within range of the lock box. Open the Lockin Home app, select your Lockbox L1, and tap and hold the unlock icon on the screen. The lock box will unlock, indicated by a green light. It will re-lock automatically after approximately 5 seconds.

Image: A user interacting with the Lockin Home app on a smartphone to unlock the Lockin Smart Lock Box L1.
Video: Demonstration of how to use the Bluetooth unlock feature via the Lockin Home app.
2.2 Unlocking via Keypad (Pin Code)
Enter your pre-set 6-10 digit pin code on the keypad and press the checkmark button. The lock box will unlock, indicated by a green light. It will re-lock automatically after approximately 5 seconds.

Image: A user entering a code on the digital keypad of the Lockin Smart Lock Box L1.
2.3 Setting Up Passwords (Online and Offline)
The Lockin Home app allows you to create various types of passwords:
- Online Passwords: These require a Bluetooth connection to the lockbox for initial setup and management.
- Еднократни пароли: Can be used only once before expiring. Ideal for single-use access.
- Recurring Passwords: Can be set for multiple uses within a specified timeframe (e.g., for weekly cleaners or short-term rentals).
- Offline Passwords: Generated by the app and can be used without a Bluetooth connection.
- Temporary Offline Passwords: Use this password at least one time within 24 hours after the password takes effect.
Access these options within the app's "Settings" and "Guest Passwords" sections. You can also share access to the lockbox with other app users.
Video: Guide on how to generate and use an Offline One-Time Code for the Lockin Smart Lock Box L1.
Video: Instructions for generating and utilizing an Offline Temporary Code for the Lockin Smart Lock Box L1.
3. Монтаж
The Lockin Smart Lock Box L1 offers versatile installation options: wall-mounted or door-hanging.
3.1 Монтаж на стена
Use the provided anchoring screws and wall anchors to securely mount the lock box to a suitable outdoor wall. Ensure the surface is stable and can support the device.

Image: The Lockin Smart Lock Box L1 securely mounted on a wall.
3.2 Door-Hanging Installation
Attach the removable shackle to the lock box. Hang the device securely over a door knob or handle. This option provides portability and ease of relocation.

Image: The Lockin Smart Lock Box L1 hanging from a door knob using its removable shackle.
4. Поддръжка
4.1 Смяна на батерията
Monitor the battery level via the Lockin Home app. When the battery is low, replace both AA batteries to ensure continuous operation. Always ensure the battery compartment is sealed tightly after replacement to maintain water resistance.
4.2 Аварийно захранване
In case of complete battery depletion, the lock box supports an emergency power supply via its USB-C port. Connect a USB-C cable to an external power source to temporarily power the device and gain access.
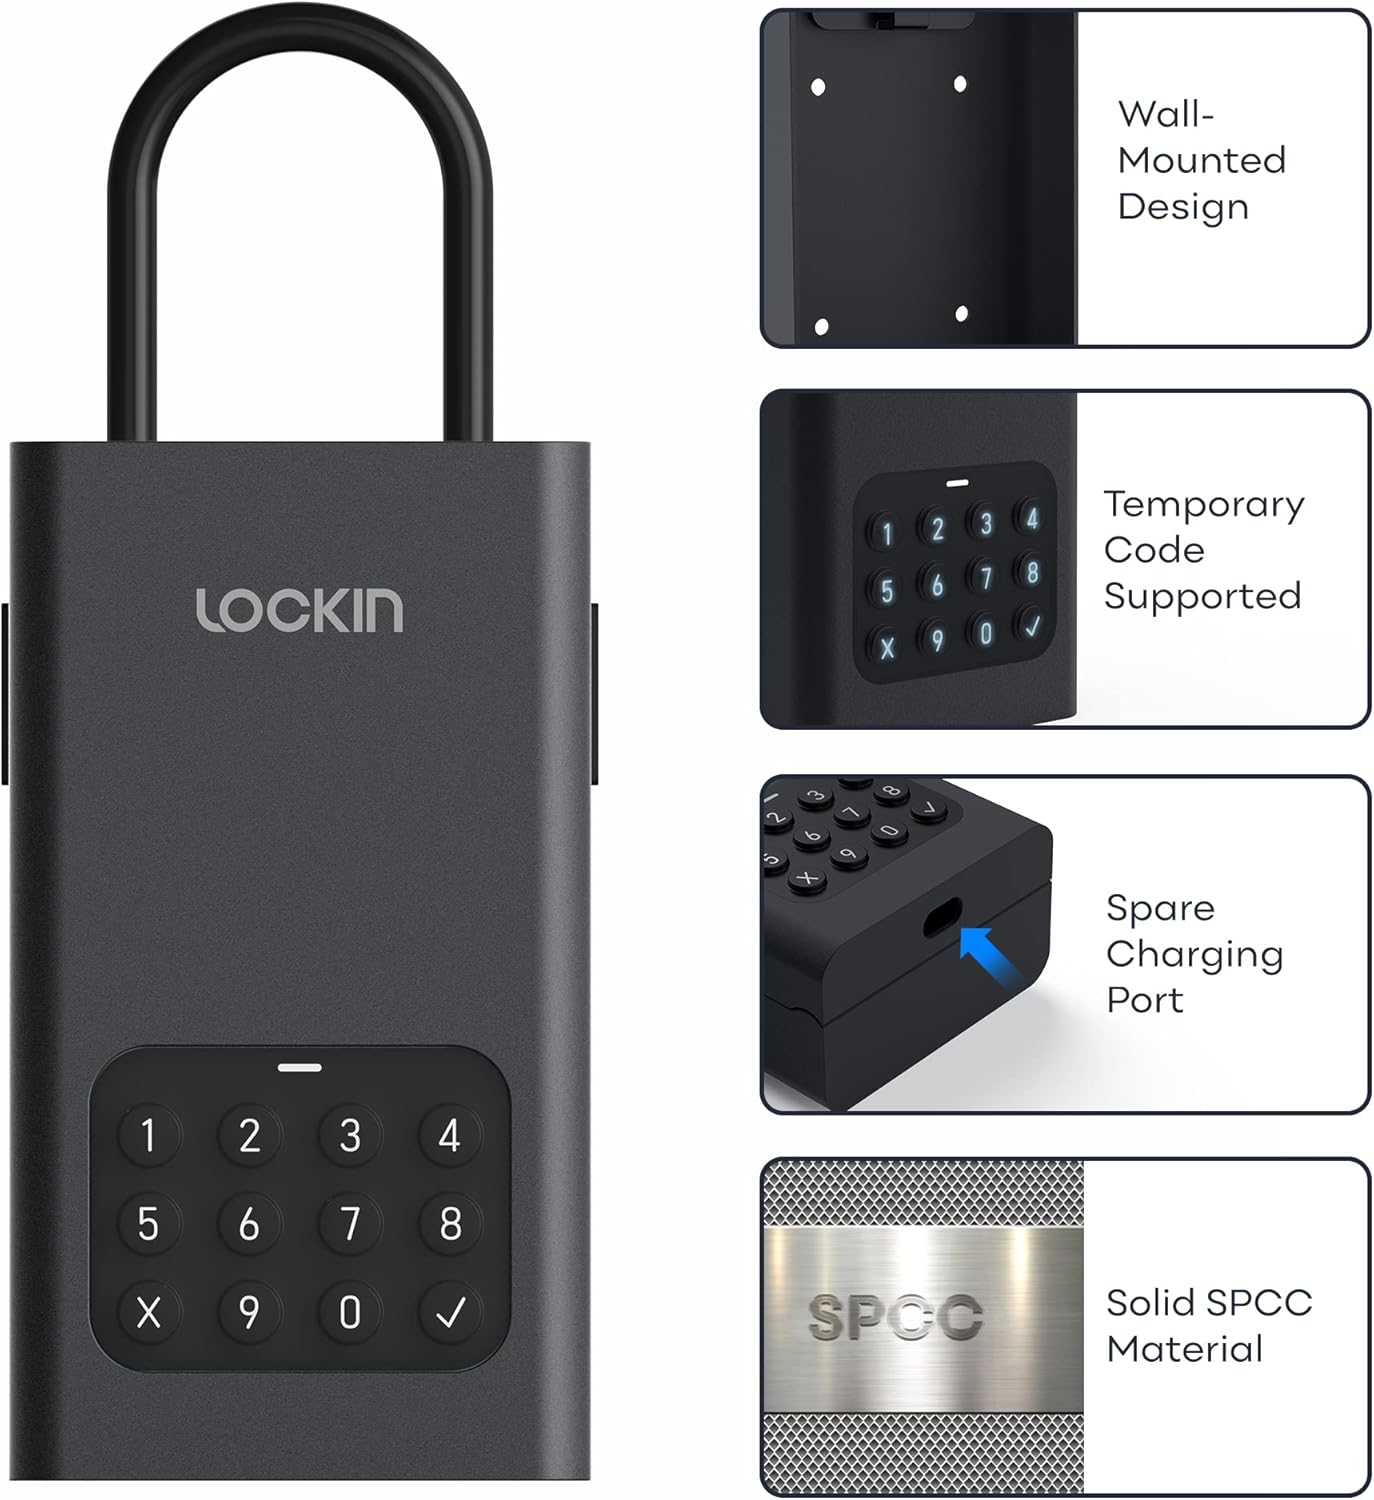
Image: Close-up of the Lockin Smart Lock Box L1 showing the USB-C port for emergency charging.
Video: Demonstration of how to use the USB-C port for emergency charging of the Lockin Smart Lock Box L1.
4.3 Почистване и грижи
Clean the exterior of the lock box with a soft, damp cloth. Avoid using abrasive cleaners or solvents. Ensure the device is not exposed to extreme temperatures or prolonged direct sunlight to maintain its durability and functionality.
5. Отстраняване на проблеми
- Lock Box Not Working:
- Проверете батерията: Ensure the battery is sufficiently charged. If low, replace it with new AA batteries, ensuring proper installation and contact.
- Check mechanical parts: Inspect for foreign objects or damage. Ensure the lock cylinder and keypad are not worn or deformed.
- Проверете факторите на околната среда: Confirm the lock box has not been affected by extreme temperatures, humidity, or other environmental factors.
- Проблеми с връзката с приложението:
- Check Bluetooth: Ensure your mobile phone's Bluetooth is enabled and you are within close proximity to the lock box.
- Check network connection (with WiFi Gateway): If using a WiFi gateway (purchased separately), ensure the gateway is connected to the network and shorten the distance between the gateway and lock box to within 10 meters.
- Клавиатурата не реагира:
- Ensure the keypad is clean and free from debris.
- Verify the entered code is correct.
6. Спецификации
| Характеристика | детайл |
|---|---|
| Марка | Заключвам |
| Име на модела | Lockin Smart Lock Box L1 |
| Специална функция | Автоматично заключване |
| Тип заключване | Електронен |
| Материал | Metal (SPCC) |
| Цвят | черен |
| Размери на артикула (Д x Ш x В) | 5.55 x 3.11 x 1.81 инча |
| Тегло на артикула | 2.2 паунда (приблизително 1 килограм) |
| Контролен метод | Приложение |
| Протокол за свързване | Bluetooth |
| Батерии | Необходими са 2 AA батерии (включени) |
| Метод на инсталиране | Strut-Mounted, Wall Mount, Door-Hanging |
7. Гаранция и поддръжка
The Lockin Smart Lock Box L1 comes with a 1 години гаранция. Lockin also provides free lifetime support за своите продукти.
For any inquiries, technical assistance, or support, please contact us at: support@lockin.com.


