1. Въведение
This manual provides detailed instructions for the setup, operation, and maintenance of your Flyrivergo Powered Wireless Laser Timer System. Designed for precision timing in various athletic activities, this system offers accurate measurement for speed training, lap times, and race events. Please read this manual thoroughly before using the product to ensure optimal performance and safety.

Изображение 1.1: Крайview of the Flyrivergo Wireless Laser Timer System components.
2. Какво има в кутията
Внимателно разопаковайте всички компоненти и проверете дали сте получили следните артикули:
- Laser Timer Host Machine (x1)
- Laser Timer Auxiliary Machine (x1)
- Adjustable Tripods (x4)
- Clamping Adapters (x4)
- Резервен Clamping Adapters (x4)
- Reflective Boards (x2)
- Charging Cables (x2)
- Ръководство за продукта (x1)

Изображение 2.1: Всички компоненти, включени в продуктовата опаковка.
3. Инструкции за настройка
Follow these steps to set up your laser timer system:
- Assemble Tripods: Extend the legs of each adjustable tripod and secure them firmly. The tripods can extend up to 5.25 feet (61 inches) to suit various training needs.
- Прикачете Clamping Adapters: Монтирайте клamping adapters onto the top of each tripod. These adapters provide a secure attachment point for the timer units and reflective boards.
- Mount Timer Units: Attach the main Laser Timer Host Machine to one tripod and the Laser Timer Auxiliary Machine to another. Ensure they are securely fastened.
- Position Reflective Boards: Place the reflective boards on the remaining tripods. These boards are essential for the laser beam to register breaks and accurately record times.
- Подравняване на компоненти: Position the main timer, auxiliary unit, and reflective boards in a straight line, ensuring the laser beam from the main unit can reach the reflective board and return to the auxiliary unit without obstruction.

Image 3.1: Adjustable tripod heights for flexible setup.

Image 3.2: Tripod base variations.
Демонстрационно видео за настройка
Video 3.1: A demonstration of how to set up the laser timer system, including tripod assembly and unit placement.
4. Инструкции за работа
The Flyrivergo Laser Timer System is designed for intuitive operation using its integrated body buttons. No remote control is needed.
Основна операция:
- Включване/изключване: Locate the power button on the main timer unit. Press and hold to power on or off.
- Начало: Once powered on and set up, press the 'Start' button to begin timing.
- Спри се: The timer automatically stops when the laser beam is broken at the finish line.
- Нулиране: Press the 'Reset' button to clear the current time and prepare for a new measurement.

Image 4.1: Details of the timer's body button controls and antenna.
5. Режими на работа
The timer system offers multiple modes to adapt to various training scenarios:
- Mode 01: Normal Mode - Standard timing for single sprints or continuous runs.
- Mode 02: Single Person Multi-Cycle - Ideal for tracking multiple laps or repetitions for an individual.
- Mode 03: Multiple People Single Cycle - Suitable for timing several individuals in a single race or drill.
- Other Modes and Settings: Includes options for shielding a time range and prompt tone settings. Refer to the on-screen menu for detailed adjustments.

Image 5.1: Multi-mode adaptability for different events.


6. Ключови характеристики
- Adjustable Tripods: Includes four sturdy, height-adjustable tripods that extend up to 5.25 feet (61 inches), allowing for precise height customization to match various training requirements.
- Premium Chipset & HD Display: Equipped with a high-performance chipset for millisecond-level accuracy and an HD display for clear, easy-to-read timing, even in bright sunlight. The durable, wear-resistant aluminum alloy frame ensures longevity.
- Long-Lasting Battery & Portable Carrying Case: Features a built-in lithium battery providing up to 8 hours of continuous use, with support for plug-in mode. A rugged carrying case is included for easy transport and protection.
- Easy-to-Use Body Buttons: Intuitive body buttons simplify operation for quick start, stop, and reset functions, eliminating the need for a remote control.
- Гъвкави режими на обучение: Offers multiple modes suitable for a wide range of activities, including sprints, cycling, soccer drills, and roller skating, making it a versatile tool for athletes of all levels.

Image 6.1: The timer's long endurance and outdoor suitability.

Image 6.2: Versatile applications of the timer system.
7. Спецификации
| Цвят | черен |
| Марка | Flyrivergo |
| Материал | Алуминий |
| Тегло на артикула | 4.83 килограма (10.63 паунда) |
| Брой настройки | 5 |
| производител | Flyrivergo |
| Размери на опаковката | 26.75 x 13.75 x 7 инча |
| ASIN | B0DRFDWGM4 |
| Батерии | Необходима е 1 литиево-полимерна батерия (включена) |
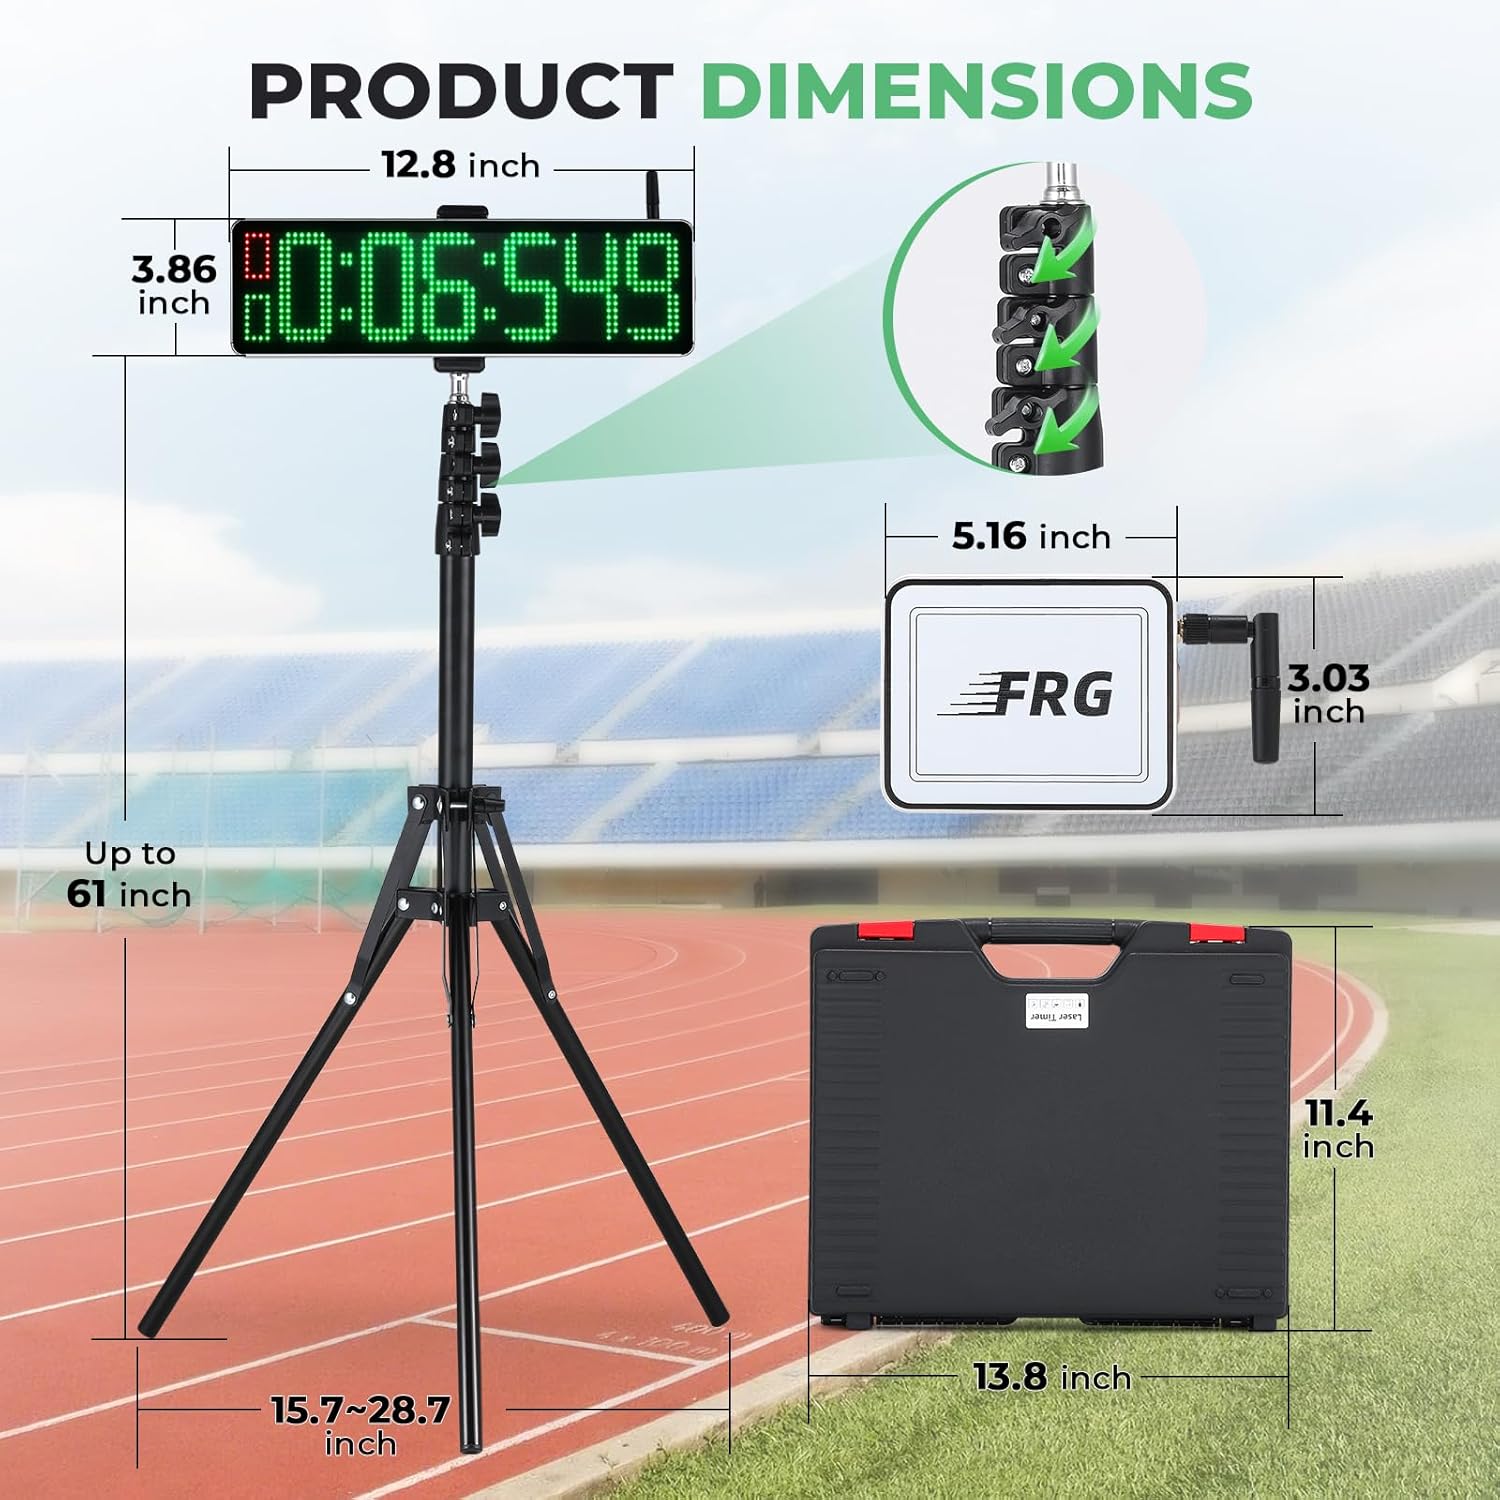
Изображение 7.1: Размери на продукта надview.
8. Поддръжка
To ensure the longevity and optimal performance of your Flyrivergo Laser Timer System, follow these maintenance guidelines:
- Почистване: Use a soft, dry cloth to clean the display and exterior surfaces. Avoid abrasive cleaners or solvents.
- Съхранение: When not in use, store the system in its provided carrying case in a cool, dry place, away from direct sunlight and extreme temperatures.
- Грижа за батерията: Зареждайте батерията редовно, дори ако устройството не се използва често, за да я поддържате в добро състояние. Избягвайте пълното ѝ разреждане за продължителни периоди.
- Лазерна леща: Keep the laser lens on the main unit and the reflective surfaces on the auxiliary unit and reflective boards clean and free of dust or smudges to ensure accurate timing.
9. Отстраняване на проблеми
If you encounter issues with your laser timer system, refer to the following common troubleshooting steps:
- Timer Not Starting/Stopping:
- Ensure all units are powered on and fully charged.
- Verify that the laser beam is properly aligned between the main unit, auxiliary unit, and reflective boards. Obstructions can prevent accurate detection.
- Check for any physical obstructions in the laser path.
- Неточни показания:
- Confirm that the reflective boards are clean and positioned correctly.
- Ensure the units are stable and not moving during operation.
- Check for strong external light sources that might interfere with the laser sensor.
- Проблеми с дисплея:
- If the display is dim, ensure the battery is charged.
- Restart the main timer unit.
Ако проблемите продължават след изпълнението на тези стъпки, моля, свържете се с отдела за обслужване на клиенти.
10. Гаранция и поддръжка
Your Flyrivergo Powered Wireless Laser Timer System is covered by a manufacturer's warranty. Please refer to the warranty card included in your package for specific terms and conditions.
For technical support, troubleshooting assistance, or warranty claims, please contact Flyrivergo customer service through the retailer where you purchased the product or visit the official Flyrivergo webсайт за информация за контакт.
Контакт с клиентите: Please refer to your purchase documentation or the Flyrivergo brand store on Amazon for the most current support information.

